
![]()
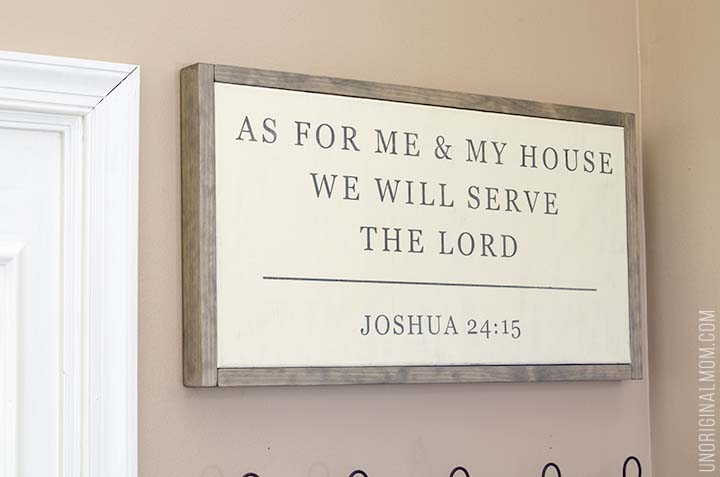
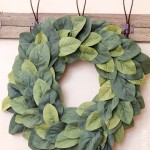
Two weeks ago I opened up to you with some decorating struggles I’ve been facing. We’ve lived in this house for almost 3 years now, and in that time I have made precious few decorating decisions and implemented even fewer of them…because I’ve been paralyzed by perfectionism and the fear of “doing it wrong.” NO MORE. I’m doing it. This little craft blogger is diving into the world of home decor. It’s not going to be perfect, but it’s going to be SOMETHING, and that’s better than nothing at all, right? Right. And I’m starting with this little nook in our foyer beside the front door! It’s starting to come together and I absolutely love it. I already shared the DIY Farmhouse Magnolia Wreath with you, and today I want to let you know how I made the farmhouse style sign that I hung above it.
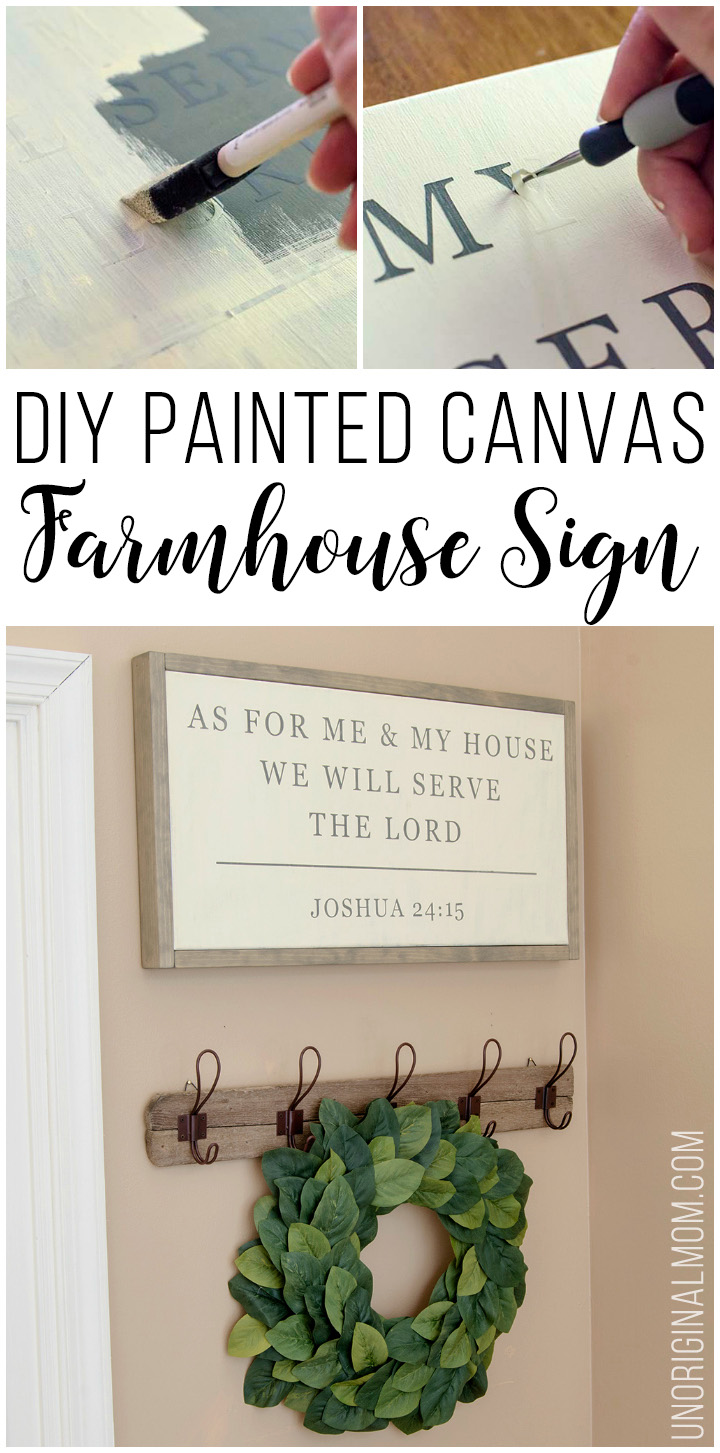
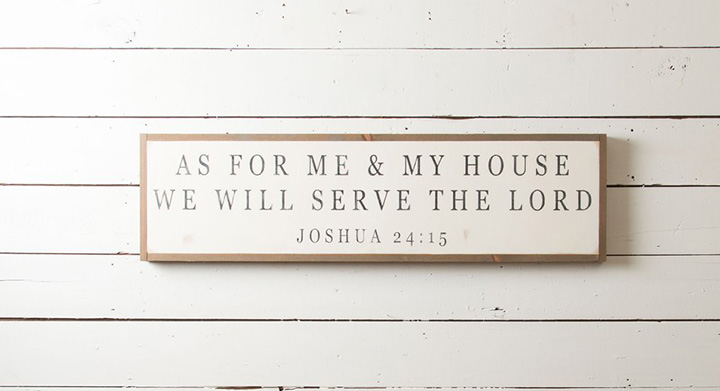
I just adore the “Me & My House” Magnolia Market sign that has been appearing everywhere…not just the style, but the scripture too. It’s perfect for our foyer nook, but I can’t afford to spend $125 on a sign! Not to mention it’s too wide to fit in our narrow space anyway. So – surprise – I set off to make one myself!
I realize that most of the farmhouse style signs like this are actually painted pieces of wood, but I wanted to try to make one with an inexpensive craft store canvas I already had on hand. I designed and cut my own vinyl stencil with my Silhouette Portrait, but I wanted to make sure to get nice crisp lines, so I used the “PVPP” stencil method – that stands for Paint, Vinyl, Paint, Paint. (I think it *technically* stands for Paint, Vinyl, Paint, Peel, but it makes more sense to me my way. I guess you could add one extra “P” on there for the “peel” at the end to be PVPPP, but that seems a bit excessive. Anyway, you’ll see why in a minute.)
SUPPLIES:
- Silhouette Portrait or Cameo
- vinyl & transfer tape
- 10×20″ canvas (or your preferred size) – I got mine at Michael’s
- craft paint (I used gray and antique white)
- brush
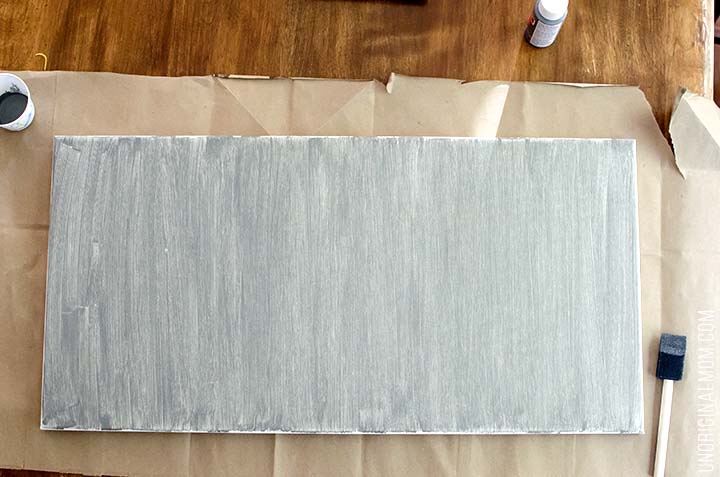
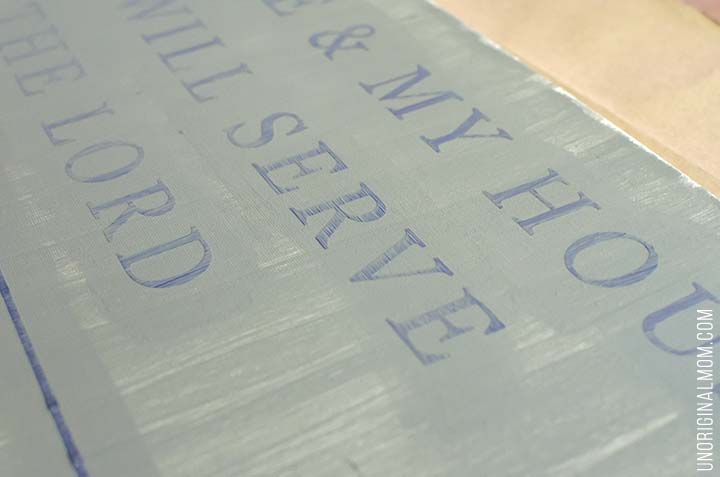
Step 1: PAINT. Before I applied my stencil to the canvas, I actually painted the whole canvas the color I wanted my letters to be – gray.
STEP 2: VINYL. I created a simple design of the scripture in Silhouette Studio, then used my Silhouette to cut it out of vinyl. I used transfer paper to stick my vinyl down on the canvas. (Note: vinyl does NOT stick well to canvas. I knew that ahead of time so I was prepared to spend a bit of time really burnishing it on the canvas well and then peeling off the transfer paper VERY slowly and carefully. Silhouette School has good tips on using vinyl on canvas here, I’d recommend reading up on them before attempting a vinyl stencil on canvas.) If you don’t have a Silhouette, you could buy scrapbook sticker letters from the craft store to create the same stencil effect!
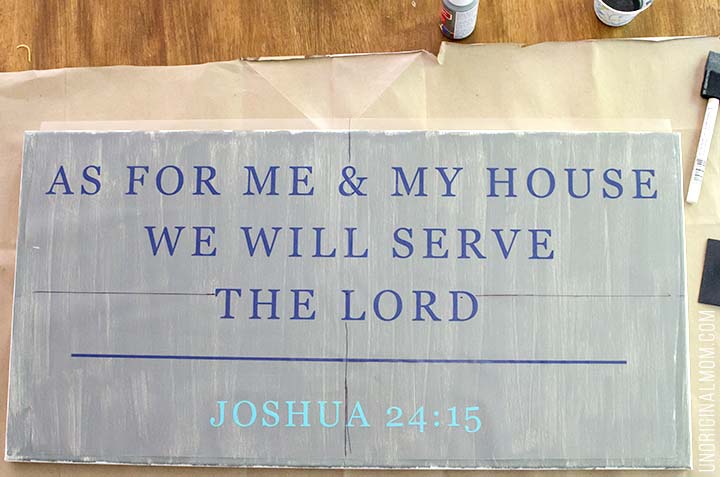
STEP 3: PAINT (again). Here’s the crucial step to making sure your stencil doesn’t bleed – paint over the stencil with the same color, and let it dry. This “seals” the edges of the vinyl, and any paint bleeds won’t matter since it’s the same color as your letters anyway.
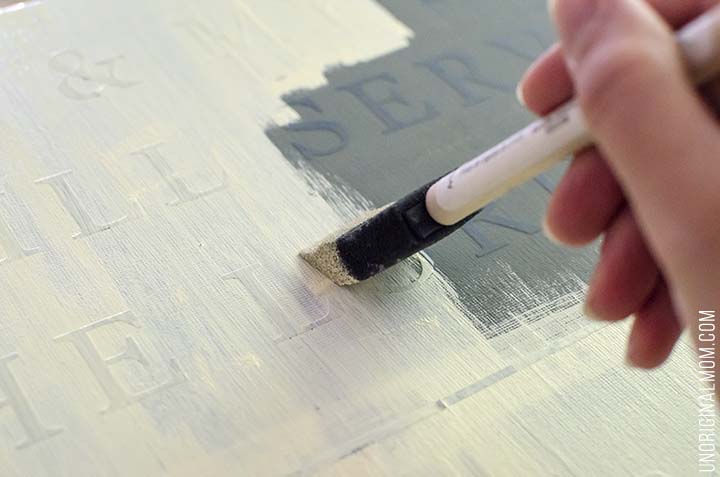
STEP 4: PAINT (again again). Now you paint your second color over top of the whole canvas. I used an antique white color, and it’s just plain old acrylic craft paint. It took about 3-4 coats to cover the gray, but I actually wanted a bit of it to show through so it had more of that distressed farmhouse look. If you wanted a nice crisp white it might take closer to 4-5 coats.
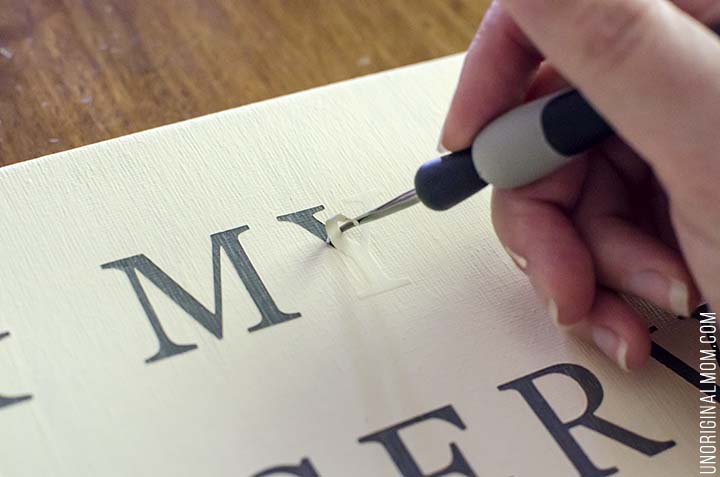
Once you’re happy with the coverage and the paint is dry, peel up your vinyl stencil and admire your perfect lettering!!
Look at those amazingly crisp lines!
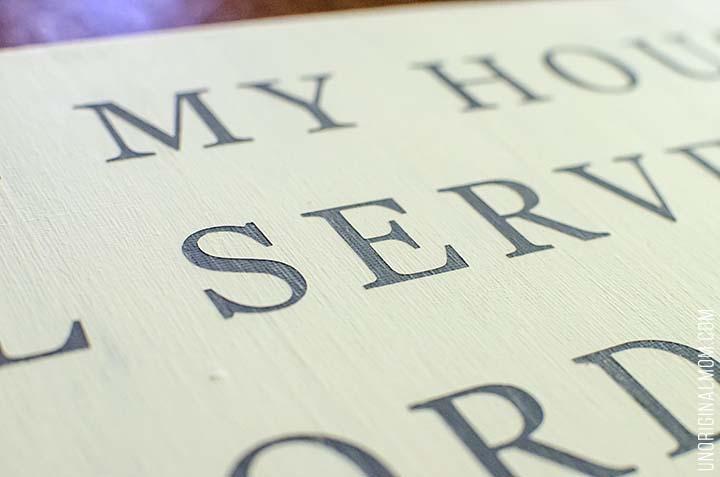
I took some fine sandpaper to the canvas in some spots to get the gray showing through a bit more here and there. The result was a beautiful vintage farmhouse style look – exactly what I was going for!
If you’re a Silhouette user and you’d like to make your own version of this sign, you can find this Silhouette studio cut file in my Silhouette Cut File library! Sign up below to get instant access – for free!
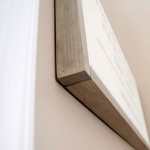
The frame was really pretty simple to make, but I devoted an entire post to a detailed step-by-step tutorial. You can find my DIY Simple Wood Frame for a Canvas tutorial here! It really adds the perfect farmhouse finishing touch, doesn’t it?
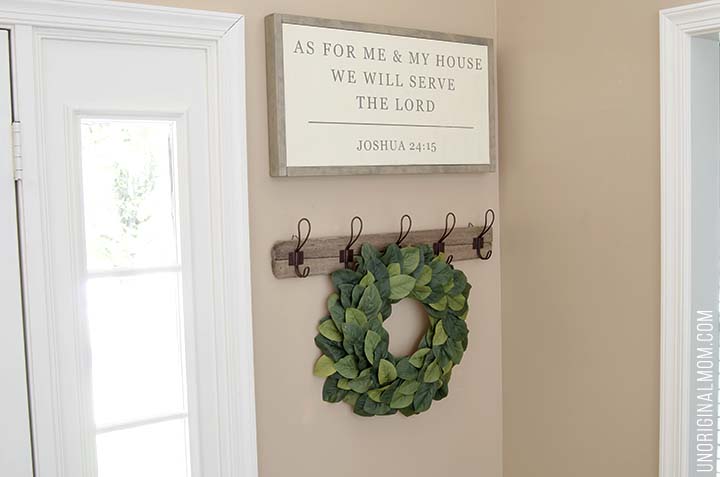
I am SO excited with how my little foyer nook is coming together! I’m working on an upholstered bench to sit underneath the hooks, and then this space will be finished! Yay!
Get this look:


BUT THAT IS NOT THE SCRIPTURE!!! GREAT LOOKING SIGN THO. I don’t understand why the DIY’ers (such as myself) find it hard to correctly quote this verse. I have made this same thing on a much smaller scale WITHOUT a Silhouette helper. If it is going to be quoted it should be done correctly. Thank you and God Bless
Hi Michelle, I’m not sure what translation you are looking at but this is from the King James Version, word for word. Of course, it’s not the entire verse, just the last few words. (The whole verse is a bit long to fit on one sign!) But this is most definitely straight out of scripture.
Great verse! I saw it and was like, she must be a Christian!
I love love love this and the scripture! Beautiful and I’m so glad you shared! I want this in my front entrance way :)
I’m super glad I found your site because I’ll be following it regularly now. :)
God bless you and your family
Mia
Thank you so much Mia!! I’m so happy with how it turned out. I love that my kids will see it every time they go through that door.
Beautiful! You did a great job! I think I’m going to try this !
Those are the coolest hooks! Where did you get them or did you buy them already attached to the wood?
Thanks Lynn!! I was excited to find them. They are from Wayfair, here’s my affiliate link – http://bit.ly/2cQJgHC
Love this. You did a Greay job. Can you tell me what font you used?
Thanks
I also love the sign and would like to know what font you used! Please share! :-) I’m looking forward to checking out how you made the frame- such a cool finishing touch!
Thanks so much Ruth! The font I used is “Georgia.”
Thank you Anita! I used the font “Georgia.”
Thank you so much for this tutorial. I haven’t tried creating a sign yet…it’s definitely on my To-Do-List which keeps getting longer and longer lol!
Your sign is gorgeous!!! I’ve always loved this Scripture ♥
BLESS YOU for writing up and posting this tutorial Meredith! Haha. I am in love with the Magnolia sign as well, but I just can’t bring myself to spend that much for it! The other day I had myself all talked into buying it, but once I saw that shipping was tons more I backed out again. Lol! Anyway, I decided to diy it for our entryway and today I bought wood to make the frame. But I knew I’d need help from other diyers for the stenciling…so just now I googled it and came across your post! Your sign is BEAUTIFUL!! You did such an amazing job. The font is exactly the same! Love it. What color gray did you use for the letters, and was it just a bottle of craft paint? I LOVE your idea of painting it all that color first – so smart! I can’t wait to get started. Thank you SO MUCH for sharing your tutorial! :)
Yay!!! I’m so glad this will be helpful for you, Britt! I just used a bottle of gray craft paint I had on hand, not sure of the exact shade but it was around a charcoal gray. Have fun making your sign!
Do you let the paint dry completely between each layer-starting with the gray, let it dry completely before adding the letters, and so forth.
Hi Nicci, yes, you should let it dry at least a little bit between coats – but definitely make sure the gray is dried completely before you put the vinyl letters on top. It took several coats of white to cover the gray and I only let those dry for about 15-20 mins between coats, so not quite as thoroughly since I was just painting the same color on top. And I was impatient so I peeled the letters off only about 20 or 30 minutes after my last coat and it turned out fine.
Two questions, what is transfer paper, and what is that tool you are using to peel up the sticker letters? How did you prevent the white paint peeling when you pulled up the stickers? I guess that’s three questions!
Hi Michelle, transfer paper (or transfer tape) is basically a sheet of sticky paper that you use to transfer your vinyl design to a surface. (This is the roll I have from Expressions Vinyl – http://expressionsvinyl.com/transfer-tape-rolls.html). The tool I used to peel up the vinyl letters after I was done is the hook tool from Silhouette – it’s definitely a must-have for any kind of vinyl designs! And I used indoor/non-permanent vinyl so it peeled right up without a problem…vinyl doesn’t stick terribly well to canvas anyway so it wasn’t hard to peel up. Oh, and I made sure the white paint layer was completely dry before I put the vinyl on top of it, too. Hope that answers your questions! :-)
Hi Michelle! I LOVE this. I am trying to get into making my own canvases at home. My concern with using scrapbook stickers is getting it perfectly straight. However, I do not want to invest in an expensive Silouette tool, which I just found out about from the link you added. Is there a way to use vinyl without a fancy machine to print the font onto the paper?Sorry- totally new to this!
Hey Lindsay, the only other way to cut vinyl is to do it by hand with an exacto knife, which would be REALLY time consuming. I have heard of folks printing out their lettering onto regular printer paper or card stock and then using an exacto knife to cut out the letters from the paper, which makes a stencil out of the paper. That could work but you may not get really crisp clear paint lines on the canvas. If you were going to go that route, you may end up with a better result on wood instead of canvas. Actually if you print out your quote and then tape the paper to a piece of wood, then use a ball point pen to trace over the letters on the paper, you’ll be left with a slight indentation in the wood which you can go back and paint by hand! I’ve done that a few times…time consuming but it works! Hope that helps!
Love it. I have 2 questions. What size font did you use a new what size I said your canvas? Again great job❤️
Thanks Angela! The canvas is 10×20. Sorry, I’m not sure what size the font is…I just kept dragging it bigger until it was the size I liked!
Love this! I have a random question for you… what font did you use to type the title where it says “farmhouse”? Have you ever tried a sign like this with calligraphy?
Thanks Jennifer! I think that font is called Starlight. I haven’t ever tried calligraphy on a sign like this because I have pretty terrible handwriting, so a vinyl stencil is my saving grace when it comes to lettering, haha! But I’m sure you could make a lovely hand written sign if you had good calligraphy or hand lettering skills. Though I’m not sure how it would work on canvas, maybe a wood sign might work better for that. If you try it, let me know, I’d love to see how it turns out!
Thanks you SO MUCH for this tutorial!!! Especially the tip of painting over the vinyl/sticker with the same under color to “seal” it. I always wondered how to get crisp edges on my letters, and haven’t been able to before!
Yes the PVPP method is the best way to get crisp lines every time!! :-)
[…] Previous Previous post: HomeMade Tub Recipes ~ Methods to Make DIY Tub Bombs | Lush Present Concepts… Search for: […]
Ingenious, I will always use the PVPP method now that I have been properly introduced! Thank you, Meredith!
Love the post! Is it possible to do without a sillouette machine ? As far as the letters ?
Hi Jen, it’s definitely possible but will be more labor intensive…I think the easiest way would be to buy letter stickers (ones meant for scrapbooking) and use a ruler to line them and space them evenly on your canvas. Then the same PVPP method of painting should work.
Hi, thanks so much for this tutorial! When I cut the vinyl it’s barely 11in long from the file you provide. Did you resize it? What size is the font on your file. It’s looking a little small for my 12x24in canvas. Thanks in advance.
Hi Stephanie, yes you’ll need to resize it to fit your canvas. You should be able to select all the text, hold shift, and drag it to be as large as you want. I recommend creating a 12×24″ rectangle in Silhouette Studio and then resizing the text to be to your liking. Hope that helps!
Would you be interested in creating more and selling these canvases? I would love to make one but just really don’t have the time. Great work!
Thanks Grace! I wish I did but unfortunately I just don’t have the time either!
[…] made a sign using this tutorial to fill the blank space on the wall above the water […]
Hi there! I’m wanting to try this with my cricut which I believe is very similar to the silhouette. Did you make your stencil in one piece or did you have to make different cuts? I noticed that the cutting mat is only 12×12 so I wasn’t sure how to get a stencil longer than that.
Hey Lauren! You can get a mat that is 12×24. Amazon has some for a decent price. But depending on the width of your canvas you may need to use a separate one for the bottom.
Love love love this!! It’s definitely some inspiration to make something special for our home. I’m currently embarking on home decor myself and this will be a great addition to our home. Thank you!
I absolutely love this. I followed your post and it came out perfectly! It was the perfect gift for my sister! So thank you! :)
Yay! Oh, I’m so glad to hear that Kyra, thanks for sharing!
[…] DIY Painted Canvas Farmhouse Sign Silhouette Portrait or Cameo + vinyl + 10×20″ canvas + craft paint […]
[…] unoriginalmom […]
[…] Create a canvas farmhouse style sign with s painted piece of wood. It was really pretty simple to make and really adds the perfect farmhouse finishing touch to your home decoration. Tutorial: unOriginal Mom. […]
[…] DIY Painted Canvas Farmhouse Sign from Unoriginal […]
[…] From: Unoriginal Mom […]
[…] Create your own beautiful farmhouse sign by Unoriginal Mom using some craft paint and some vinyl letters. This art project is totally customizable as you can […]
Absolutely gorgeous! Thanks so much for sharing the technique. I have never seen it before. I have a Cricut and can’t wait to try it!
Thanks Cathy!! It’s a great technique for stenciling, I use it all the time!
One question…I just tried this with a piece of formica covered board. It may have been the different medium or possibly the paint, but my paint peeled up a bit during the final weeding of the letters. Any suggestions?
Hm, yes it sounds like maybe the paint didn’t stick to the board well enough. You could go back and touch it up by hand, or if you want to try again I’d recommend a coat of primer down first. And make sure the first layer of paint is completely dry before applying the vinyl letters (ideally even 24 hours), I’ve been impatient with that step before and had paint peel up.
The first time I followed this tutorial is worked great. The 2nd time my top coat peeled up with the letters. Any advice?
I always peel it up when the paint is still wet, and that works. Also, make sure your previous coats are completely dry before applying the next coat. The only time I’ve had real trouble is when I used a metallic paint, which peeled up no matter what I tried…so if it’s still happening, maybe it’s the brand/type of paint?
$175 dollar silhouette thingy? Well thats totally out of the question. I print mine out on printer paper, then shade the back of the paper in with lead pencil, flip it, trace it onto the canvas with the lead pencil. Then either paint it in or use a fine tip Sharpie. Basically free.
Hi. Ive been makimg farmhouse signs on both canvas and wood and find that vinyl and transfer tape are so tricky on canvas.
I have never tried doing it this way. Usually I weed out the letters and then left up the whole vinyl with transfer tape. Your way may take more painting but its less vinyl to pick up. Hmmm I might try it.
Beautiful sign and verse.
What stain did you use for the wood border? I like it!
Thanks Janicke! Yes vinyl and transfer tape can be very challenging on canvas…I do much prefer stenciling on wood. But I love doing this reverse stencil method on both canvas and wood, I find it’s much easier to get crisp lines! I used Minwax Weathered Oak stain on the frame, you can see more details about it here – https://www.unoriginalmom.com/simple-wood-frame-for-a-canvas/
[…] Check out the guide for this tutorial at Unoriginal Mom! […]
[…] DIY Painted Canvas Farmhouse Sign from unoriginalmom.com […]
Your work is beautiful! I’m just starting out doing these, do you think this nail gun would work just as well?
https://www.amazon.com/gp/aw/d/B01BD0B2FC/ref=sspa_mw_detail_0?ie=UTF8&psc=1
Thank you,
Heather
Thanks Heather! I know almost nothing about tools, haha, thankfully my husband handles all that so I couldn’t tell you much about that nail gun. It would likely work well for basic frames like this though, you don’t need anything fancy. Or a predrilled hole and a small finishing nail work well, too!
[…] Inspired by Magnolia Market? take a look at this Homemade DIY Farmhouse Sign. | Unoriginal Mom […]
I am looking to be super lazy!! Do you think I could use spray paint as a top coat? And lightly dust it across? I will be doing white letters and a grey top color. Thanks for this inspiration! I love it!!
Yes, I definitely think you could! I’d just be careful not to put it on too heavily…it might take two coats.
Did you purchase the Silhouette starter kit to get started? Does these same steps work on wood also?
The vinyl starter kit is a great way to get going with vinyl, since it includes your vinyl, transfer tape, and the scraper and hook tool! I got one shortly after I got my first Silhouette machine. But you could also purchase the supplies separately. And yes, I use this same method with wood signs…I actually have two different posts about it here you might find helpful:
https://www.unoriginalmom.com/painted-laundry-room-sign/
https://www.unoriginalmom.com/farmhouse-style-sign-painting-party/
[…] Source: Unoriginal Mom […]
[…] unoriginalmom […]
Hey Meredith,
We’re practically neighbors-Ohio here. Just wqnted to say, Don’t compare your worse to someone else’s best. We’ll never make it. Besides, who wants a place right out of a magazine? Yes, you can copy the look which is fine. But my point is your house needs to have your touch, your family’s imprint. Whatever you do your famiy will love it because you did it & you did it for them. Go for it girl!! Also, do you know how to make an SVG file that will do Chinese Paper Cutting, or Sghitaenitsen? I would be very interested in buy that. I would like it to be a farmshouse style. TIA
Thanks so much for the encouraging words, Paula! I agree completely. I have never heard of Chinese Paper Cutting, but on a quick Google search it looks beautiful! Sorry, I don’t have any SVGs in that style.
[…] signs have been changed by canvas in the latest season. This is because we can get tons of fonts and personalize our names. Furthermore, you are able to pick some in the […]
[…] Tutorial: unoriginalmom […]
[…] Source […]
Hi Meredith,
I love this idea & I’m really excited to try a version of my own! Since you are removing the vinyl did you spray the canvas with the adhesive it suggests in the silhouette school tips? My biggest concern is getting the vinyl to stick but also still come off. Thanks!
I did not use any spray adhesive, but it was also pretty challenging to get the vinyl to release from the transfer tape and stick to the canvas. It took a fair amount of patience but it worked for me!
[…] Source […]
Hi! Newbie here! Can I do this with my Cricut explore air?
Yes!!
[…] signs have been changed by canvas in the latest season. This is because we can get tons of fonts and personalize our names. Furthermore, you are able to pick some in the […]
Great tutorial and tips!! I’ve wanted to try this for a long time. I think the time is right!! Thanks!! Yours turned out great.
[…] unoriginalmom […]
Fabulous job. I have this scripture, and I love it. Thank you for sharing yours.
[…] unoriginalmom […]
[…] Build This Sign […]
Did you use a canvas board or a stretched canvas?
I used a stretched canvas from the craft store. Though a canvas board probably would have made it easier to transfer the vinyl stencil!
I love your determination to overcome perfectionism and just dive into decorating! Your farmhouse style sign turned out beautifully. The DIY approach is not only budget-friendly but also adds a personal touch to your space. Using a canvas instead of wood was a creative choice. Your step-by-step process with the Silhouette Portrait is inspiring!
I love your determination to overcome perfectionism and start decorating! The farmhouse style sign for your foyer nook sounds amazing. Can’t wait to see the final result! 💖