
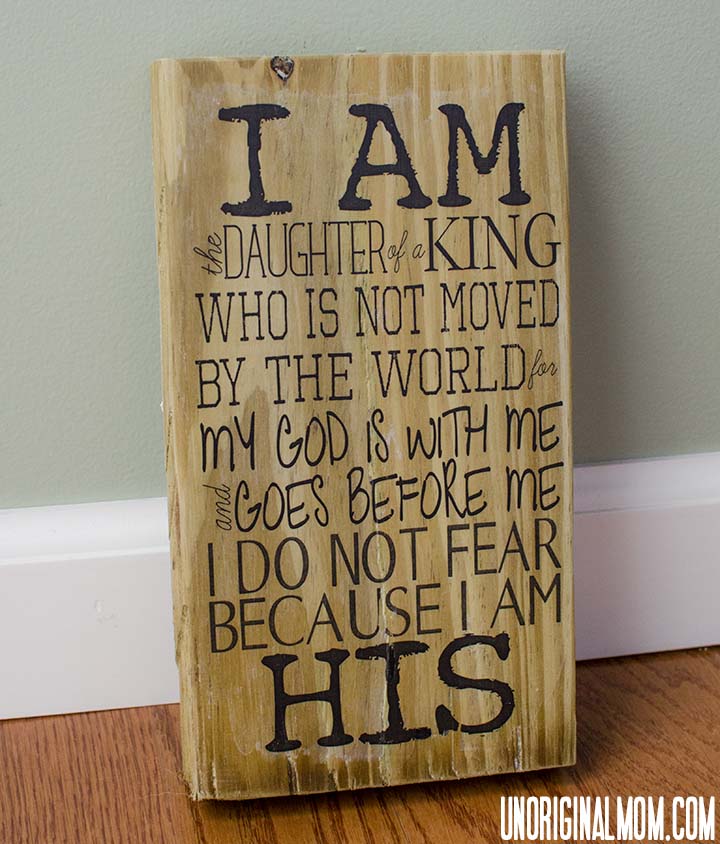
Last week, I shared with you a free printable declaration called “I am His,” and I told you I was working on a special way to display it…here it is!
This was an easy DIY image transfer to wood using gel medium and sealing with Mod Podge. I’d been wanting to try this technique for a while after seeing it on Pinterest. This is the video tutorial I followed.
Here is what you need: (This post contains affiliate links – click here to read my full disclosure.)
- Gel Medium – I found it at Michael’s with the artist acrylic and oil paints – not with the craft acrylic paints. (FYI, the Mod Podge photo transfer stuff is not transparent, it will leave a white background, so don’t use it on wood unless you want a white background. I found that out the hard way…)
- Mod Podge
- Brush
- An image – printed with a laser printer as a mirror image on regular paper so it’s reversed (if you don’t have a laser printer, use a photocopier to make a copy of your image and use that! An inkjet image will NOT work!)
- A piece of wood, cut to the size you want, or whatever material you’re transferring the image to. (If you’re painting the wood first, make sure it has dried completely.)
- Sponge & water

Step 1: Gather your materials.
Step 2: Generously cover the wood with gel medium. (I covered the image…but it would have been much easier to just cover the wood. Plus I don’t think I would have ended up with the cloudy smudge looking things around the edges of where the paper was. But that’s ok, I think it gives it some character!)
Step 3: Carefully place the image face down on the wood. Smooth out all the bubbles and press it down firmly!
Step 4: Let it dry for at least 24 hours!!
Step 5: Using a damp sponge, wet the surface.
Step 6: Rub off the wet paper with your fingers. I had to repeat this step a few times to get all the paper off.
Step 7: Cover with Mod Podge and let dry.
You’re done! Find a great spot to display your artwork.
This is a really neat technique – I’m excited to try it with photos, and on other mediums as well!
In case you’d like to try this technique with the “I am His” printable, HERE is the mirror image version I used to make mine, so you don’t even have to flip it – just print and get going!
UPDATE: Since trying this image transfer to wood technique several years ago, I discovered another amazing way of putting a design onto wood – you can paint it on using water and ammonium chloride! It gives a really neat, branded look…kind of like wood burning, but faster and easier. Check out the video “how-to” below, and then head to this blog post for the full tutorial.
Here are a few other fun wood projects I’ve tried over the years.
DIY Wood Table Numbers with Vinyl
Reversible Thanksgiving-Christmas Farmhouse Sign
Inspired? I’d love for you to subscribe to my email list for even more inspiration!
This post contains affiliate links – click here to read my full disclosure.


Get your copy of my FREE meal planning binder!

Sign up to get a free copy of my meal planning system - an 11 page printable meal planning binder, complete with a pantry inventory, shopping list, and more to help get on top of your menu each week!


Great ob on the transfer! Very inspirational sign.
This looks great! I haven’t done transfers like this before…Thanks for sharing:)
Thank you for this tutorial! Glad to know a particular brand of gel medium that will work this way (clear). I haven’t had the best success with some transfer methods – but this looks great! I’ll be looking for this gel. Great project! Catherine (new follower)
Hi Catherine, thanks for stopping by and following! This worked really well, and the brand of gel medium that I got (artist’s loft) was actually pretty inexpensive, about $3 or $4. At first I was seeing other brands that are a little bit bigger jars for $13 or $14! So if you only need a little bit for a few projects, the cheaper one is definitely the way to go.
How do you reverse the image?
Hi Cherie, if you want to use the image that I did, I provided an already reversed file for you…if you want to do it with one of your own, depending on the program you’re using, there should be some kind of option to “flip image horizontally” and that will reverse it! Hope that helps!
Meredith you just simply amazing :) out standing, awesome!
Hey! I have seen this and I am just now realizing how truly simple it is! Thanks for the tutorial! Do you know if light-colored text will work on dark wood with this method? Most of the ones I have seen have dark text on light wood… just curious as to whether or not you’ve tried it.
That is an interesting question, Brittany, and I don’t know the answer! As long as it’s a color laser print, it *should* work, but I’m not positive. If you try it, definitely let me know how it goes, I’d love to see.
Great project! I’ve wanted to do something like this…you’ve made it look easy. Thank you for sharing.
It was easy! The hardest part was waiting for it to dry overnight…I’m not a patient person, haha!
I’ve been wanting to do this for a while too! I’m glad to see it worked out so well for you! Any idea why it is sealed with Mod Podge as apposed to a clear coat of varnish?
I think just because more people have Mod Podge on hand – I’m sure varnish would work too!
Thanks for the reply! I think I’ll still get some Mod Podge just in case – I don’t want to risk wrecking it with a harsher product – maybe I’ll do a coat of poly over that. :) New follower by the way!
Let me know how it turns out!
I love this Meredith! I printed out your free printable last week and hung it on my bulletin board. Now I’m going to make my own sign. Thank you so much.
Blessings, Patti@OldThingsNew
P.S. Pinning too!
Aw, I’m so glad that you are enjoying the printable! Hope the sign turns out well, too!
Wow! First of all, cool sign!! And the tutorial is so easy to follow! I pinned it for future reference. I’m also following you on Bloglovin, Pinterest and Twitter! Have a great day!
Selene @ Restoration Beauty
Thanks a bunch Selene!
Awesome post. I can’t wait to give it a try :)
This is very neat! Thanks for sharing, pinned it to check out later!
http://www.leahinspired.com
Very cool! I definitely want to give this a shot!
I’ve tried this using Elmer’s glue instead of the gel medium because I found a tutorial about it, only it wasn’t the best transfer. I love the idea and your text, so I’m going to buy this gel and give it a try. Thanks!
Thanks Bonny – let me know how it turns out!
I love this, what a good message to put up and how cool on wood. I will have to try this, so cute! Came over from Someday Crafts Link Party!
That is so pretty! What an inspiring quote and wonderful process! Congrats on a job well done!!
Keep ‘em coming…
hugs xx
Crystelle
Crystelle Boutique
Wow! Where have I been? I didn’t even know this was possible :) Thanks for opening my craft mind up to so many more possibilities.
We’ve love for you to show your posts with our readers at our Finished Friday Link-up.
I know, I was a little bit skeptical until it actually worked! Linking up now :-) Thanks for stopping by!
I’ve got to get some of that Gel stuff!!! Amazing! Thanks for sharing at Tasteful Tuesdays @ Nap-timecreations.com. You are being featured this weekend in me Writing on the Wall round up! :o) Would love for you to put my featured button at the bottom of this post…
Emily
http://www.nap-timecreations.com/2013/05/alphabet-art.html
[…] only do I appreciate the DIY wood transfer tutorial on this post, but the message is something that I need in my life. […]
Love the message and the tutorial. Pinned and shared a link on my blog. Thanks so much for posting!
Karen @ annumography
Thanks Karen! Glad it the message spoke to you…it is always very comforting to me too!
Wow, this is so cool! Thank you so much for sharing this. I will be featuring this on my party highlights this week. :)
[…] DIY Ink Image Transfer to Wood by Unoriginal Mom. […]
[…] How to transfer image to wood? […]
I love this sign sooo much! I’m definitely going to be using this technique in the future! I have half finished night stands waiting to be monogrammed. This is perfect!
I would love for you to come share this at my link party!
http://craftandrepeat.wordpress.com/2013/05/06/on-display-monday-link-party-1/
I hope to see you there!
Have a wonderful week :)
Brianna
I love this! More importantly I love the promise! I’m hosting a new linky party at http://hickorytrailblog.blogspot.com/2013/05/efforts-and-assets-linky-party-1.html
I would love to have you!
Angela
Thanks so much for linking this up at the Pinterest Power Party! This post is being featured tomorrow! =)
Danielle
SewMuchCrafting.com
[…] from …And Away We Go!! {6} Embroidery Hoop Art from Prairie Girl to Southern Belle {7} DIY Image Transfer to Wood from Unoriginal Mom {8} Baseball Boy’s Room from There’s a Mouse in My […]
[…] quote will be going up in Baby Sis’ room when we move! For sure. Meredith from Unoriginal Mom shared a tutorial on how to do an Image Transfer and she made it seem so easy! I think I’m […]
[…] By Unoriginal Mom […]
THIS.IS.SO.AMAZING!!
Thank you SO much for sharing! :)
http://www.iheartmygluegun.com
I LOVE THIS! I just KNEW there was a way to do this – thank you for sharing. Very nice and very inspirational! Found you through 7Alive’s 5/1 linky party.
~Sherry from WhoNeedsACape.com
Thanks! It opens up endless possibilities, doesn’t it?
I was just laying in bed an had the most incredible idea! I had pinned a image transfer tutorial before but couldn’t find it, that’s when I found yours! I will have to let you know when I complete my creation an I wanted to thank you for the easy to follow Instructions you’ve provided us! Thank you!
Thanks, Sharee! I’d love to see your project when you’re done!
Wow amazing
Tried this last night and rubbed paper off today… couldn’t believe my eyes!!!
Mine turned out pretty white looking, I don’t know if maybe I didn’t get all the paper off or what but I didn’t want to ruin it rubbing too much.
So I stained oak stain over the top and it seemed to disapear.
Thanks so much for sharing
I know, isn’t it neat? I’m so glad you gave it a try! I also had a lot of white looking residue, and I found it was mostly paper…I just kept wetting it with a sponge and rubbing, and paper kept coming off! If you look closely at it, though, you can definitely see where the gel medium is, because I only put it around the text on not all the way to the edges of the wood. Covering it with a little bit of stain is such a great idea, though! I hope to try this again soon with another project, I will have to keep that stain idea in mind!
Just FYI, I just did this yesterday and am rubbing off the paper today. I don’t know why but the blank ink is smearing and rubbing off too – I guess I don’t have the right printer ink or something. :( Not sure how to salvage the project.
erm, blaCk ink, not blaNk ink
I had the same problem! Maybe because i used an ink jet printer?? I think I’m going to just paint over it and try again, with a photo copied print. Will that work, Meredith?
-Fern
Yes this technique definitely won’t work with an ink jet printed image! If you use a photocopied image or one from a laser printer it should work.
So i tried again, using a photo copied image. When i go to rub off the paper with my wet sponge it takes off part of the letters as well. why is this?? I would like for the letters to look black and crisp. It’s not as smudgy as my first try, but part of the letters rubbed off. Is there a way i can send you a pic of it? Thanks!
Hi Fern, I’ve only done this twice myself so I’m not an expert! But in my experience that’s because it wasn’t pressed down hard enough with you applied the gel medium, or possibly the surface wasn’t completely clean/smooth in that spot to begin with.
Great article, quick question do you use a inkjet or laserjet printer? Or does it not matter? Thanks
Hi Eric, I have a laser printer…so I’m not sure how it would work with an inkjet! But if you try it with one, let me know how it turns out!
Is this just regular printer ink?
Tina I used my laser printer and it worked great…I’ve heard mixed results about how it works with inkjets. If you have an inkjet, take it to a copy center and just make a photocopy and it should work great!
[…] Lucky St. Patrick’s Day Sign. You can go to Meredith’s blog & view how to do it at UnOriginal Mom. The only thing I did differently is that I let the color image set on the wood for a period of […]
Hi Meredith! Thanks so much for sharing. I tried this and had a little trouble getting the paper off. Do you have any tips. It seemed that rolling it worked the best.
I tried it twice and the 1st time I let it dry for 24 hours, the 2nd time I let it dry for 16. I didn’t see a difference but maybe that’s why I am having trouble getting the paper off easily. Again, thanks so much for sharing this!!!!! JANIE
Yes, definitely try a laser printed image…but I also had to work pretty hard at getting the paper off, too! I just kept wetting it and rubbing it off in little pieces. Hope this works for you!
UT oh, I just re-read this. I used an inkjet printer. I’ll try your suggestion!! THANKS!!!! JANIE
Oh Meridith I love you for showing me this. I finished this HUGE piece I was working on. I experimented with it thinking if it comes out really bad I will just sand it down and start over. I have learned so much…… First, ink yet does work but it makes it look more old, your lazer jet letters are beautiful. Second, I put a few letters on and blow dried them until they felt dry (about 5 minutes) it worked but they came out green not black so I would definitely recommend waiting over night at LEAST and third: I wet a few sections too much and there was painted wood underneath the letters. The paint started peeling off the wood so I had to stop, pat the letters down and let them dry. I LOVE the outcome though. Its cool looking. I’ll send you a pic if you want to see it. THANKS AGAIN!!!!!!!! JANIE
I would absolutely LOVE to see a picture, Janie!! You can email it to me if you’d like, meredith@unoriginalmom.com. So glad it worked for you. I have been wanting to try this on a bigger project for a while now…just haven’t gotten around to it yet. Thanks so much for sharing your tips!
PS as far as having trouble getting the paper off? I used the scrubby side of my blue sponge and GENTLY scrubbed then wiped away the mess with the sponge side. Then let it dry again and redid some areas. Its beautiful. Thanks again!! I don’t have the money for vinyl letters right now
[…] DIY Image Transfer to Wood […]
I want to try this craft with my son’s classroom and I tried several techniques to choose the easiest one. I tired it with Lumitex gel medium, Mod podge image transfer and regular Mod podge and surprisingly got the best results with the regular (matte) Mod Podge. The other ones always ended up with air filled bubbles, no matter how much I tried to get rid of them. I am still having difficulty getting rid of the paper completely, there is always some sort of “fur” left behind. Rubbing too much starts lifting the image. I found that a small ammount of the “furry look” dissappears with a coat of Mod podge.
Very interesting, thanks for sharing your results, Diana! I didn’t have any problem with the Artist’s Loft brand gel medium from Michaels, so maybe the brand does make a difference. I also did a final coat on mine with Mod Podge, that definitely helped to give it a nice glossy look.
I love this so much! I need one for me and one for each of my four daughters. I had better get busy!! Thanks so much for sharing.
Hi, i tried this recently and it worked.
The only thing I’m wondering is.. if i have an image where the background is white, when i transfer it onto the wood and rub it off, all the white areas (including the background) gets rubbed off and becomes the colour of the wood itself. Is there any way I can make the white areas remain white instead of it being wood? I only want the piece to be wood but the image itself to still be the original state?
Also, is there any way to brighten up the image? Because I tried and when transferred, the image colour becomes darker than the original. Thought of playing around with brightness and contrast in photoshop but not sure if that would work and how much of the brightness and contrast needs to be changed? amy.
Hi Amy, glad you found this helpful! This technique only transfers to ink, so unless you have an image with white ink somehow, the white doesn’t transfer. If you want a complete image to just be on a wood background, you might try using mod podge to just decoupage your paper onto the wood – that way you’ll have better color too. This technique isn’t meant to transfer a perfect photo with bright colors – it just creates a neat rustic effect of text or images on wood. I’ve only ever used it for text, not color images, so I’m sorry I’m not more help!
Thanks for the reply! :)
I love this!!! I have never seen this done with words. It looks amazing. I’m thinking of printing something at office max large and putting it on a large piece of wood. Do you think that would work? Does it have to be printed a special way?
Thanks!
That sounds neat! As long as it is a laser print (like from a copy machine) and not an ink jet print (like an inkjet home printer) it will work!
I was just curious if it matters if you have an inkjet printer or laser, I’ve heard it matters and some others say it doesn’t matter.
Yes, it does have to be a laser printed image! If you don’t have a laser printer, you can just make use a photocopier to make a copy and use that.
[…] here via […]
[…] here via […]
[…] doing a bit more reading online, I decided the method using a Gel Medium was the best option, given I was on a limited timetable to complete the project. Not knowing how […]
Maybe you’ve answered this already but how can I make it fit a full sheet of 8 1/2 X 11 paper? I’d like to make it bigger than it’s printing out.
Kay, I have been dying to try transfers and I’ve only seen tutorials for transfers using inkjet printers so this is a revelation to me! You just saved me going out to buy an ink jet printer… so THANKS!! I’ll be zooming out for some gel asap and trying my hand at this!
Also! I LOVE this quote…pretty much i love everything about this post! You rock!
I love this! Do you know how it might turn out on a canvas board? I’ve never tried this before but am excited to give it a try!
I did try this once on a stretched canvas and it didn’t work very well, I think because I couldn’t get enough pressure to adhere it to the canvas? Not sure why. But if it works for you, I’d love to hear about it!
I have tried this 3 times, and they keep coming out with a green tint… any clues what i am doing wrong?
Sorry, no ideas, that’s never happened to me!
Can it be done using an ink jet printer?
No, it must be a laser printed image. There are details about that in the post.
This is wonderful! Thank you for sharing!
Do you mind telling me the size of the wood?
Love this! Is it long enough just to let it dry over night, or does it have to be 24 hours?
I don’t know Kentley, I’ve never been brave enough to try it! I usually even give it a smidge longer than 24 hours just to be safe.
Hey Meredith! I know you’ve said before the laser printed image works best but I don’t have one and do not have access to one. Will the transfer not work at all with inkjet or is it just more difficult? Also do you know if I can stain the wood after I transfer it or would I need to do this prior? I’m using Mathew 5:9 instead of the pretty saying you’ve provided. (It’s a Christmas present)
Hi Josie! No, this technique will not work with an ink-jet…an easy way to get a laser print, though, is to just take your ink-jet print out to a copy store and make a black and white copy! Don’t forget to mirror it first, though, so the words are reversed. As far as staining goes, I would stain before…the layer of gel medium would probably prevent you from getting an even finish on the wood. Then just coat the whole surface with a layer of mod podge or other sealer after you’re done for a nice, even finish.
Alrighty. When I make my weekly trip to town tomorrow I’ll stop by the copy place. Thank you for the stain tip!
This is so cute! Does this work on painted wood as well?
Made mine but the glue has turned the wood an orange colour (yours went white).
Can you use this technique on metal as well?
Hm, it probably would work to transfer the image/text, but because this technique is actually transferring the image IN the gel medium, it probably wouldn’t look so great on metal (it would lose it’s shine and texture since there would be a layer of the gel medium on top). But maybe worth an experiment? Let me know if you try it!
Do you need to use a lot of medium? I used a thin coat and it’s not working very well. Most of the wording came off with the paper.
Yes, don’t be afraid to really put a bunch on!
Love you ideas!
would this work on canvas
I did try it once and it didn’t work well for me…you have to be able to press down the design really firmly, which I think was the problem. There is photo transfer mod podge or iron-on photo material and other similar things that may work better on canvas!
For anyone not wanting to wait overnight for the gel medium to dry (I used to use Liquitex, and before that – Mod Podge)… You can give this method a try:
https://www.youtube.com/watch?v=_lTh4JJyZtA
I’ve also found it to be more clear than the other gel mediums, as it is technically a wood finish. In the video, I remove the paper just after 45 minutes of drying. (You should really give it at least two hours, which even still is much less than what you may be used to.)
I’m a little confused. I read somewhere that it has to be printed with a laser printer but you said you could use a photocopier. We have a printer/scanner/copier–do you think that would work?
I’m really excited about this…glad to know how to do it now!
The important thing is you need to use a device that prints with toner rather than ink…a laser printer and a commercial grade photocopier use toner, but if your home printer/copier uses regular ink cartridges, it won’t work. But you could easily take your printed pages to a copy store and make plain B&W copies on their copier to get those laser-printed images! Hope that is helpful!
[…] Our ‘Always’ cake topper was a wooden sign purchased from Michael’s and the text transferred via these directions. […]
Hey Meredith, I’d love to do this on an old cabinet door I picked up recently, but it’s already been professionally painted/sealed. Do you think the transfer would still work?
Can you do this to painted canvas instead of wood?
I have an ink jet printer. I see you said to use a photocopier if you don’t have a laser printer. How does using the photocopier make a difference?
Thanks!
A laser printer and copy machine use toner rather than ink.
My image rubbed off as well. I don’t understand why that happened???
Hey Meredith! This is an awesome project! I’m so glad that you shared how to do this! I am actually looking at doing something like this for my parents for above the door frame. I have a few questions though. Do you put the print/writing that you put onto the wood on only 1 paper? Or can you put it on multiple pieces and line it up how you want it? And sorry I did not read all the comments but was there a certain brand of the Mod Podge or that gel that you recommend using? Thanks! ?
[…] the numbers onto wood using a gel medium. This is an awesome tutorial all about how to do it. You get near perfect results, and you save […]
Would this transfer work on a canvas?
Elle, it *might* – I tried it once and it didn’t work very well for me though. Mod Podge makes an image transfer to fabric product that might work better than this method. But let me know if you try it and have success!
[…] via unoriginalmom […]
Hello Meredith! This was a very Awesome DIY! I wanted to know is there anything else that I could use in substitute of the Gel Medium as well as do you think that the Mod Podge Gloss would work just as well as the Matte? I’ve printed out what I want to put on my wood piece, but just wanted to be for sure about my choice of products before moving forward. Your DIY project has been very inspirational to me and I strongly encourage you to keep up the good work. You do a Fantabulous Job ?!
Aw, thanks La’Shunda! You can certainly use whatever type of Mod Podge (or other type of sealer) you’d like on top, matte or gloss. But for the transfer I’m not sure if/what else you could substitute for the gel medium, I’ve never tried it with anything else! If you find a substitute that works, let me know!
So with this method you do not have to use the paper straight out of the printer while the ink is still wet right? And can this be done with an image as well? My husband has been wanting me to make some signs to decorate our trailer with and that’s when I found your tutorial! It seems like the quickest way to make a sign.
Hi Sarah, you need to use a laser printer so the ink is never actually “wet,” since it’s toner. It actually doesn’t matter when the image was printed. And yes, any kind of text or image printed with a laser printer or copier will work!
Hi Meredith, this was a great po, Thank You!! I have some discoloration btwn the image I transferred and the actual wood. What can I do to not have that difference?
Hi Nicole, I ended up with that too – it’s just the gel medium on the wood and there’s not much that I’ve found you can do about it. a coat of mod podge or other sealer on top helps make it less noticeable, though.
I love this diy, it’s so cool! I was wondering if this works if you use white ink. The wooden plaque I have is stained a dark color, so black ink would not show up.
Thanks Ashley! Most printers don’t have white ink so that wouldn’t work :-/
Very nice! The end result looks good and the print is quite dark..which unfortunately never happened with me… I’ll try this method for sure… Thanks for the tutorial.
[…] fonte foto (tutorial) […]
What size is the wood you used
[…] different methods that I found online, none of them really worked exactly like I hoped but I like this method the best. I had this method picked out sometime earlier in the year, but with the renovations at […]
[…] Image Transfer with Mod Podge […]
I was so excited to try this for my nursery decor, but it didn’t work. I did have my image printed at Office Max on standard 24 weight paper. However, when I wet the paper, most of it just seemed to peel right off not leaving any ink behind. But some did, so atleast part of it worked.
Do you think it could be the paper or did I just not apply enough gel medium to transfer the ink in all areas?
I’m sorry it didn’t work! I would say it could be one of two things (or a combination of both) – not enough gel medium (you really have to slop it on there!) or not enough drying time. I’ve read tutorials with this same technique where people let it dry for as long as 2-3 days, and they don’t have as much of an issue with the gel medium and ink peeling up. So it couldn’t hurt to try it again and let it dry for a long time! Then be gentle as you’re removing the paper, it usually takes me several different sittings of rubbing it off a little at a time. Let me know how it works out for you!
How smooth does the wood have to be? I have old fence panels that I would like to use.
[…] DIY Image Transfer To Wood from unoriginalmom.com […]
I’m really late to this party, but am currently waiting my 24 hours, not very patiently I might add! Can’t wait to reveal my project! Thanks so much for sharing!
What gel memduim did you use?
This DIY image transfer to wood looks amazing! I love how you shared all the materials and steps. I’ve been wanting to try this technique too. Can’t wait to see the final result. Thanks for the inspiration! 🌟