
About a month ago my husband stumbled across this video on using ammonium chloride to brand wood, and I was totally intrigued! It looked like a really neat technique with lots of great crafting possibilities. I ordered some ammonium chloride on Amazon right away to try it out…but I think a bunch of other people must have had the same idea, because it went on back-order :-( I finally got it last week and promptly tried it out. Guys, wood burning with ammonium chloride is SO. COOL. It’s also a technique that’s really hard to capture in photographs – you have to see it to believe it. So I whipped up a quick little video to show you how this technique works. It really is like magic!
Ok, now for a little bit more detailed tutorial. First of all, a disclaimer – I’ve read that ammonium chloride isn’t a very dangerous chemical, but it still is a chemical – so it’s probably a good idea to wear safety glasses and gloves when you handle it. And definitely store it out of reach of children.
(this post contains affiliate links – click here to read my full disclosure)
SUPPLIES:
- Ammonium chloride
- Heat Gun
- Wood slice (you can use any piece of unsealed and untreated wood)
- paint brush (or you could use a water pen, or even an empty stamp pad with a stamp)
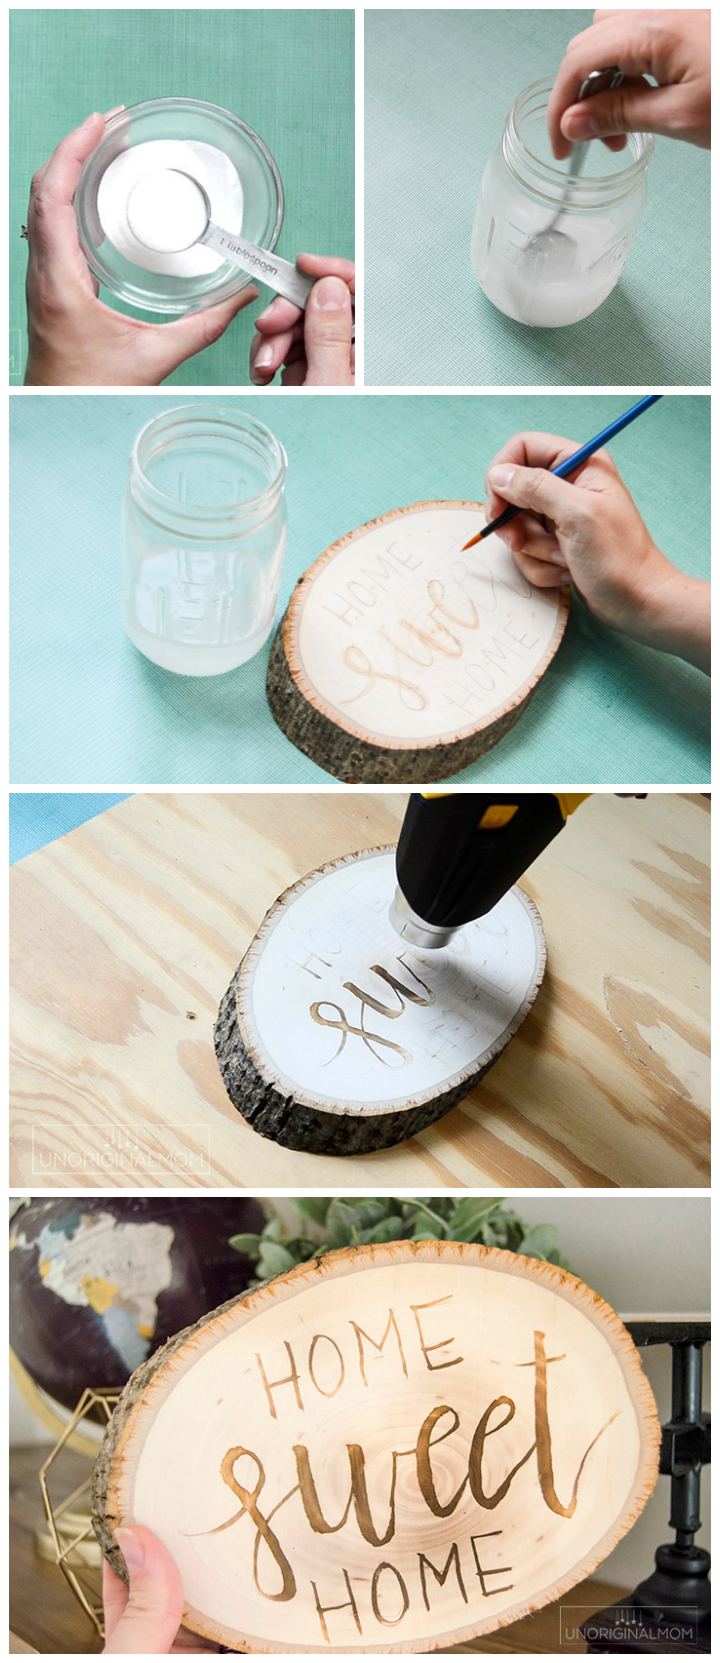
STEP 1 – Mix up your ammonium chloride solution – 1 T. to about 1/2 cup of warm water. Stir until dissolved.
STEP 2 – This is really an optional step, but it’s helpful to *lightly* sketch your design with pencil. (A light pencil line won’t show through the wood burn, but a darker line will be visible, and you can’t erase it afterwards.)
STEP 3 – Use a paintbrush to paint over your design with the ammonium chloride solution. (You could also use a water pen for a bit more control, if you want!) Use a very small amount of solution on your brush at a time – too much can make it run, and there’s no way to “undo” where your solution has been painted!
STEP 4 – Make sure your wood is on a heat-resistant surface. (I just used a scrap piece of plywood.) Using a heat gun, carefully heat your design until the brand appears. The longer you hold the heat gun over the design, the darker the brand will be. Don’t hold it in one place too long or you may begin to scorch the surrounding wood. I did try a hair dryer to see if it would work, but the temperature was just way too low – I didn’t even get a slight burn. You definitely need the heat gun for this process, but they’re not terribly expensive…this is the one I picked up at Lowe’s for about $20.
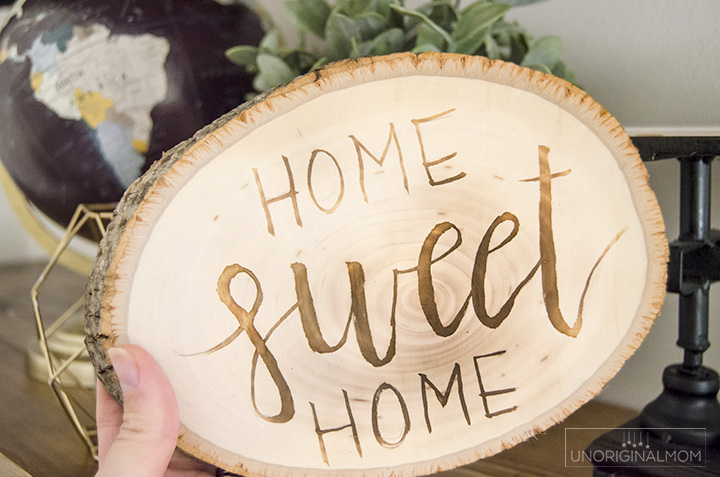
That’s all there is to it! Isn’t it neat? I love the variation in color and texture you can get with this technique.
It’s a very different result than you’d get with a wood burning tool. I’m excited to try some different methods with this technique!
UPDATE – since this video went viral on Facebook a few years ago, several companies have come out with wood burning markers! It looks like they use a chemical solution like this and put it in a marker, so you can have more control over your burn. It’s not really meant to be used with stencils as it can bleed, but you can use the marker to write your design onto the wood and then use a heat gun to burn the design, just like I did here. If you’re interested, here’s a link to one of the markers on Amazon!


Get your copy of my FREE meal planning binder!

Sign up to get a free copy of my meal planning system - an 11 page printable meal planning binder, complete with a pantry inventory, shopping list, and more to help get on top of your menu each week!


Hi Meredith,
Did you try this with stamps yet? Does it damage the rubber on the stamps?
Thanks
Lesley
Hi Lesley, I haven’t tried it myself yet but I’ve seen a few other videos of people that have with success! I don’t think it would damage the rubber.
How about making a stencil with vinyl. Paint in the words, remove the vinyl and use the heat gun. Meredith, do you think that would work? The vinyl would keep it from bleeding. DOes the solution need to be wet when you use the heat gun or can it be dry?
Hi Kate, you could definitely try it! It will work with after the solution has dried, too. My concern is that the solution would bleed under the stencil since it is so thin. It’s on my list to try, though – I am planning to use the stencil and paint over it with mod podge, then peel up the vinyl and paint with the solution, so the wood will burn where the vinyl was. Make sense? If you try it either way let me know how it works out!
Have you tried this method yet?? Could you please do a tutorial?
Do you mean with the stencil? I actually haven’t gotten around to trying it yet but I have some ideas for Christmas gifts so I will be trying it soon! I will update this post with links to the tutorial once I publish a new tutorial!
You should use “Thick It” with the Ammonium Chloride so that it doesn’t bleed.
What amounts of Thick It and Ammonium Chloride do you mix together to make your paste?
I’ve done it and it works great!
Hi Kate. I tried this for the first time today. It turned out great. I did have trouble with the vinyl pulling up painted wood but it looked rustic with a white wash finish so it was okay. I am currently making coasters using the same method. I use thickener to make it more like a pudding consistency so that it doesn’t bleed.
I tried this with raw wood but the painted letters just bleeded and flowed. It seems like the surface was too rough. Can I first use a sander to get it more smooth?
Hi Lindie, I had something similar happen the first time too. It takes a VERY small amount of solution on your brush! You could even use a paper towel to blot the brush and get off any excess. And yes, a smoother surface will probably help, too, so you could try sanding it down.
Does it actually burn the wood?
Yes, it’s more of a brand and the surface stays pretty smooth (unlike a wood burning tool which puts small indents in the wood with the burns) but it does chemically burn the wood.
For the plywood you use, does it require long drying before use?
Hi Jessica, there really isn’t any drying time at all! As soon as you apply the solution you can use the heat gun, you don’t have to wait for it to dry. Is that what you mean? But even if you do let it dry before you use the heat gun, it still works the same way.
I’ve used the commercially available pens with good results. I bought a jar of ammonium cloride from an aquatics supplier, mixed as you suggested and it does not change colors. I added more chemical in stages untill all I got was a white powder when heated. What am I doing wrong?
For me that happened when I was trying to use a hair dryer…I only got the burn when I was using the heat gun. Maybe you need more heat?
Hello Meredith!
I am looking to use this for a Father/Daughter craft idea. Do you have to wear a mask or gloves? Is it safe to breath in.
Hi Blayne, I really couldn’t say for sure…I didn’t wear a mask or notice any fumes but you’ll want to do your own research just to be safe. Gloves are probably a good precaution.
Hello,
I attempted this by making a vinyl stencil! I put the decal on the cutting board purchased from Walmart. Then applied varnish and removed the vinyl. Applied the ammonia chloride but it bled around where the decal was. Do you know how to avoid this? Thank you!
I know how to prevent bleeding. However this is 3 years later…thicken your solution with cornstarch! You still should only try to get the liquid in the stencil area. I spray my entire piece with Rustoleum clear mat spray. I apply about three coats. Don’t worry it dries quick, I just want to make sure every corner has been covered correctly. When you remove stencil you can easily see where to apply liquid. I also blot with a paper towel as I apply. If you should have some bleeding you can use an exacto knife and gently scrape (with the grain) off the part you wish did not bleed through!
Glad you made the comment 3 years later, it worked for me :)
I use a Cricut to cut vinyl decals, paint it on, let it dry, and pull up the decal.
Did you do this technique on the “I Am His” using the print out you provided on the original post about it? Just curious….we are hosting a ladies day at our congregation with the theme Daughter of the King and thought this would be perfect. But would definitely like to watch a tutorial if you’ve done it already! Thanks. KL
Hi Krystal, no, the “I am His” sign was a different technique that’s actually an image transfer…this one is wood burning. I don’t have a video tutorial for that one, unfortunately.
I would like to make one of these as a table centerpiece where people can put their hot pans on it. Do I need to put something on top of it to protect it?
Great idea! I don’t think you’d need to do anything to protect it, as it’s the same as a wood burned design – it’s literally burned into the wood, so nothing is going to scuff it off. But if you’d like a more “finished” surface, adding a coat of Mod Podge or polyurethane would work well.
Hi, I wondered if you could help me?
I’ve been trying this idea for a couple of weeks now and have had no luck, followed all the steps and others who have done a similar thing. I’ve used a stamp and hand painted onto wood however, as soon as I put my heat gun on the wood, the ammonium chloride solution just dries as if nothing is there, so it just leaves me with a blank piece of wood.
Any idea what I can do?
I don’t have a lot of experience with this technique so I’m not quite sure why that’s happening…but here are some troubleshooting ideas! What kind of wood are you using? Is it possible it’s been treated somehow and isn’t letting the solution soak into the wood? You might also try a bit of a stronger solution. Or it could be that the stamp isn’t transferring enough of the solution, so maybe try just painting on the wood to see if that works?
It could also be that the heat gun isn’t hot enough. I tried a hair dryer and that did the same thing you’re describing – just dried the solution without making any mark on the wood – because it wasn’t nearly hot enough.
the wood in untreated and I’ve tried painting, so perhaps its not hot enough like you say! I will have to take it back and invest in a better one I think! Thanks for your help. It does feel more like a hairdryer as you describe.
thanks
I dont suppose you know what Vault your heat gun is? mines 230v 300w
I’m not sure of the voltage but the temperature settings of my heat gun are 750*F to 1100*F. (The one linked to in the supplies list at the beginning of the post is the one I have)
You should wait until your solution dries to begin heating it up. Otherwise it turns to what you just described. But you can take a razor and gently scrape away the white powder and reapply.
I also just posted some tips on how to prevent bleeding and removing bleeding as well a few questions above yours. These tips have helped me tremendously throughout my trial and error. To know the amount of cornstarch to add just Google how much cornstarch should I add to X amount of liquid for a paint or honey consistency.
[…] Wood Burning with Ammonium Chloride – Unoriginal Mom […]
Hi. It looks like you painted the wood slice with a white paint prior to applying the solution?? Am I seeing things?
Nope, I just put the solution on the bare wood!
grazie Meredith
Awesome…I am sensitive to chemical smells. Does the powder or mixture have an odor? Thank you.
No, I didn’t notice any odor at all!
Do you know if this technique can be used on leather or any other material?
It is a chemical burning reaction with the wood, so I don’t believe so…but I don’t know for sure. Sorry!
[…] was originally going to do this faux wood burning project, but after testing it out, I realized the designs had to be very simple. The ammonium chloride […]
To prevent bleeding maybe try frog tape to make ur stencil. I use for paint stenciling. Let me know if it works w this. Have too many.projects going now but would like to try this method.
Can you tell me how out your heat gun is.. Mine gets to 350 degrees F and still wont work to cause chemical burn.
This is the heat gun I have. It heats to 750 F on the low setting, so it sounds like yours isn’t nearly hot enough.
What brand of ammonium chloride did you purchase and where? Locally all I can find is a 45lb bag of it at the AG store. Also, from what I’ve read, when you mix the solution, you are supposed to use warm water, as you stated as well. Thank you for the helpful tips and info!
I bought a small bag on Amazon – it’s linked in the supply list :-)
I love how easy simply and clear while including tips & ‘tricks’ from your experience working with the ammonium chloride. Thank you.
I am, however, curious about a few things with this chemical and maybe I am not using the best ‘search’ words to locate the answers and hoping you might know.
While I realized that 1TBSP from 1lb is minor, wondering IF you have remaining solution, can it be saved for future projects? If so, best way to store it? What would the shelf life of that mix be? And, would it be possible to rewarm it without issue?
I was hoping to salvage remaining portion in a glass jar, preferably with a lid; rewarming it in a dish of warmer water, IF this is feasible. Please let me know your thoughts. Again, thank you for your awesome post on this chemical and DIY.
Hi Tina, I’m sorry I don’t know! I would err on the side of caution and say you should discard the solution when you’re finished with it and mix up a new batch for each project.
Store it in a glass jar and try it out.. You can eat this stuff. True story
Hi Meredith,
Thanks for your post on this wood branding technique.
I was just wondering if you knew long ammoniumchloride left outdoors lasts? I make garden furniture and its left fully exposed… I’m curious how long these wood burns last and if they still look good after several years.
Many thanks :)
Cedric
Hi Cedric, I don’t have any firsthand experience with branding outdoor items, but this technique is actually a chemical wood burn, so once the wood is burned it doesn’t wash away or anything like that. I’d imagine as long as you seal/treat the furniture the way you would otherwise the wood burn would be permanent.
You can use a small amount of xanthum gum or a product used for thickening food to the solution to control the ‘running’ solution. Found it on a ‘cricut’ tutorial. Don’t remember details but shouldn’t be hard to find it … You Tube
WOW, thank you so much for all the helpful information! Your original posts are apparently before the chemical pens came out. They’re sooo expensive I thought perhaps I might be able to find what chemical is used and do it myself at home. Low and behold your posts came up!!! I’m so excited! Thank you to too the gal about the xanthum gum to thicken the solution.
Cornstarch works great too! I used 1TBSP of cornstarch with 7 TBSP water and heated in microwave for 1 minute and then stirred in 1 Tbsp Ammonium Chloride. No bleed whatsoever!!! But the heat gun warped my board. Hmmmm now to problem solve that!!
Can you save the left over of the AC, water and food thickener in a glass jar to reuse it or not. Thanks.
I am just now learning about this wood burning technique. My friend did it on a cutting board as a wedding gift for her friend but I can’t find anything that tells me it it’s a food safe OPTION for a cutting board. The board looks awesome but will the people be able to USE it or is it just decorative now?
Yes. Its food safe. You just need to fully wash the board before using it
I purchased a cutting board on Amazon and I wanted to make this for a gift. When I applied the chemical and put the heat to it you could see it went down into the grains of the wood leaving a ugly mess. My question is how do I avoid this I really want to make this for my daughter
I would guess that any kind of wood cutting board you can purchase is going to be treated with something on the surface of the wood – this will only work with raw wood to get an even burn.
hi i love the way you have described this, youve made it look very easy and im going to be buying some amonium chloride today from amazon, im in the uk but ive found it fairly cheaply here too, what i wanted to ask you was will a small heat gun work, i have one of the smaller ones as i already craft items out of resin, i only have the small one as i dont make anything large enough yet to warrant having the bigger heat gun, so just wondered if this would work as you mentioned above that the hair dryer didnt work. i also wanted to ask do we need to put any thickener in it, ive seen others do this on groups that im on and some have mentioned thick it, or using cornstarch, i just wondered if this was something that was needed or you had ever used, thank you for your advice thus far above it has been very useful thanks clare
The left over solution, are you able to store it? If yes, for how long and how??
Thank you!
I’ve never tried it, so I have no idea…sorry!
You can mix it with a product called Thick-it to thicken up the solution so it doesn’t bleed.
I’m not sure if you’ve sice learned this or if someone above already mentioned it, but if you add ay food & beverage thickener powder to your mixture, it will thicken it. This prevents bleeding which happens with just water and AC. Mr Crafty Pants recommends 1 T AC, 1/2 c water, 8 tsp thickener but I have found I do not need a full 8 tsp, and it gets plenty thick.
If it is too thick, it tends to crust up and not absorb into the wood quite as much.
Another tip, you can save the mixture for multiple future uses. I cover the cup with Press n’ Seal or sometimes I put it in a ziploc baggie. If it does get a little dry, simply add a couple drops of water and stir until it becomes thin enough to apply with a brush. I’ve re-wet my solution several times and it hasn’t affected the effect at all. Of course, if you’re doing a small project, you can mix less of each ingredient.
This sounds like an amazing wood – burning technique! I love how you shared your experience from ordering the ammonium chloride to trying it out. Can’t wait to see the video and try it myself!
I was chatting with a mate at the local pub when he brought up a new place he’d been trying out. I decided to try Galactic wins out because I was bored of my usual routine in the eng region. The variety of slots online and online casino bets kept me busy for hours even though I started with a losing streak. Just as I was about to walk away, a lucky spin covered my losses and gave me a tidy profit. I’m quite happy.