
We didn’t find out the gender of our baby before she was born (best surprise EVER!), but pretty much every nursery item out there that’s gender neutral is either Teddy Bear, Noah’s Ark, or Rubber Duck themed. (Seriously, can’t someone come up with some more creative stuff for gender neutral nurseries and baby clothes??) Since I didn’t like most of the nursery decor that you could go out and buy, I was on the lookout for easy DIY decor ideas I could make myself.
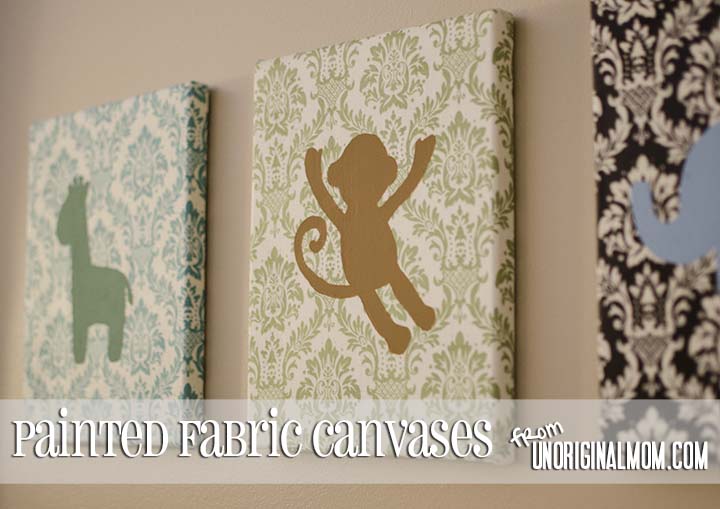
Anyway, I usually am not a big Martha Stewart person…nothing against her, just never really got into any of her stuff…but I happened to be flipping channels and landed on her show when they were making these fabric silhouettes on canvases, and thought they would be a great addition to the nursery…so I decided to give it a try!
My mother-in-law has a great eye for decor and is an incredible seamstress, so she had helped me to pick out some colors and fabrics for the nursery. We painted the walls a taupe-brown color, and picked out the accent colors as cream, sage green and light blue. I went back to JoAnn’s in search of some fabric to use for this project…I knew I wanted something matching, but slightly different. I ended up deciding on a damask print that they had in light blue, light green, and brown – perfect! I picked up some 8×10 canvases at Michael’s (with coupons of course).
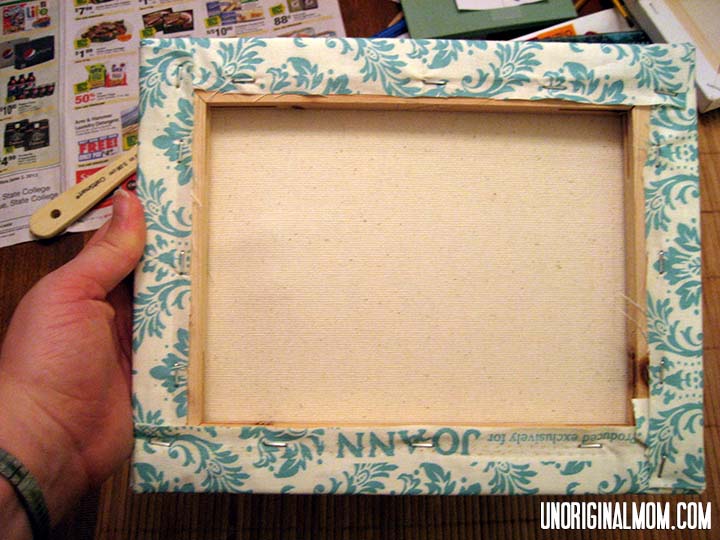
The first step was using a staple gun to staple the fabric onto the canvas. (Don’t worry, my husband supervised me quite closely while I was doing this!)

This is where it might be helpful to watch the Martha Stewart video, because it has great instructions on how to get perfect corners.
The next step is to use Mod Podge (I used a clear medium gloss) on the front and sides. This is what “seals” the fabric and gives it more of that canvas texture. Let it dry for about 30 minutes.
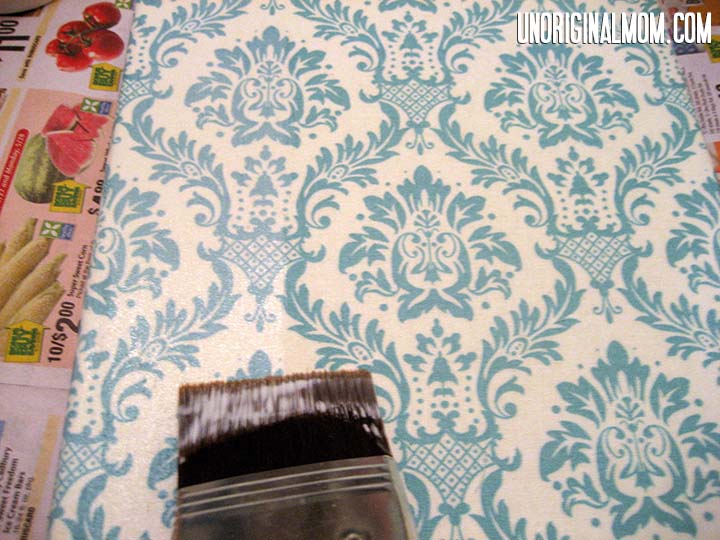
I was making 3 canvases, so by the time I had finished stapling and Mod-Podging the other two, the first one was competely dry.
Now, the fun part. Decide what you’d like to paint on your canvas…an animal silhouette, a name or initial, or any other fun shape or design! I knew I wanted some jungle animals, so I did a google image search to find silhouettes I liked and printed them out on cardstock. Once you’ve done that, cut it out and trace around it with a pencil.
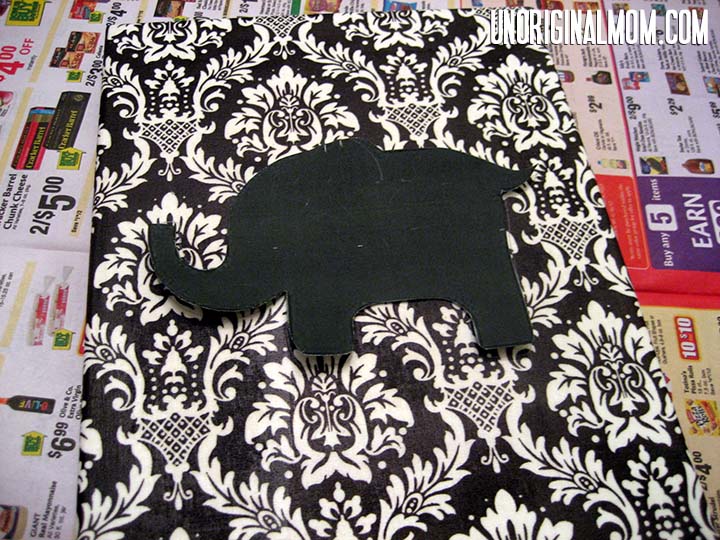
A word of caution – the fabric above was brown and white, but once the Mod Podge went on it made it look almost black. Just be aware that your dark colors will look even darker once they’ve been sealed with Mod Podge!
Using whatever color of acrylic paint you’d like, paint inside the outline you just traced, or paint outside of it. It all depends on whether you’d like your silhouette to be the color of your paint, or to be the fabric showing through surrounded by the paint color. (Depending on your paint color, you might have to do two coats.)
I was originally going to make 6 canvases – two of each animal, the first one with the paint inside the silhouette and the second with the paint outside the silhouette…but I decided that was going to make the wall too crowded. It might be a neat look, though – let me know if you try it, I’d love to see how it looks!
Here’s how all three of them turned out:
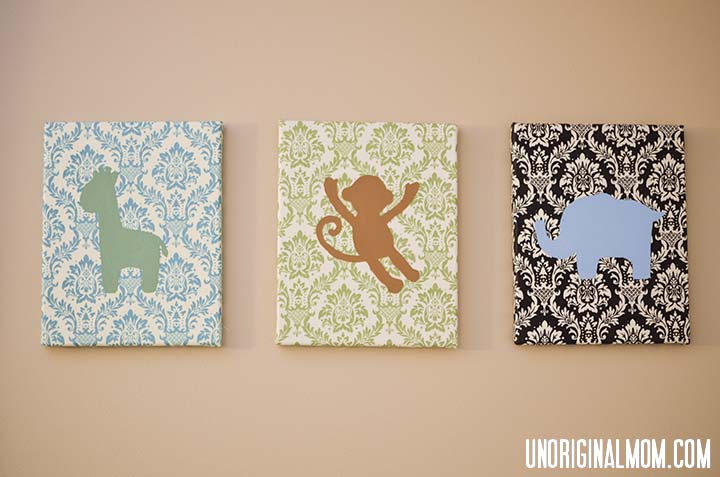
All in all, they were really easy and inexpensive to make and required virtually no talent or creativity :-) I love that I was able to add a personal touch to the nursery decor – in just the colors and designs I wanted – without spending a whole lot of lot of time, energy, or money!

**Check out other winning DIY ideas in the Winner’s Circle!**
Where I Like to Party – take a look where this post has been linked up!
Also at Home Stories A to Z and Watch Out Martha


Get your copy of my FREE meal planning binder!

Sign up to get a free copy of my meal planning system - an 11 page printable meal planning binder, complete with a pantry inventory, shopping list, and more to help get on top of your menu each week!


Those turned out so cute, Meredith! I love the simple look. They make the room look really classy. I’m pinning to try in my daughter’s room. I hope you’ll link this up today (or anytime this weekend) at One Creative Weekend on OneCreativeMommy.com.
Thanks! And they are so easy to do! Would love to link up, thanks for the invite!
Wow how cute are those?! I love that they don’t have a plain background the fabric really gives them that extra bit they need to be very special! I’d love it if you’d come link up on my weekly linky: http://www.katiesnestingspot.com/2013/02/a-crafty-soiree-131.html
Thanks! They are so super easy, but they look great in the room. I’ll definitely link up, thanks for the invite!
Hello, I’d love to have you come share your post at Show and Tell Saturday #6 at Sassy Little Lady!
http://www.sassylittlelady.com/blog/show-and-tell-saturday/show-and-tell-saturday-6
Kathie
Thanks for visiting! Linking up now! :-)
What a great tutorial! I’d love for you to share this or any of your great ideas at the link party going on now (and every Saturday through Tuesday) at ‘Or so she says …’ Hope to see you there! http://www.oneshetwoshe.com
Thanks, Mariel! Just linked up :-)
This is really a cute idea! I’m going to pin it. Little Bit from http://www.DecorateWithaLittleBit.com
Thanks for the visit and the pin! :-)
Great idea! They turned out really well. And, I agree, not finding out the baby’s gender is the best surprise!
Thanks, Lauren! We were so glad to wait and be surprised, but it seems like almost nobody does that anymore!
These are so adorable! Lucky baby! I found you at A Bowl Full of Lemons– thanks for sharing!!
~Abby =)
Hi Abby, thanks so much!
These are super cute! Love the idea!
Found you via link party! Carolyn
http://www.ccmcafeeperspective.com
Absolutely adorable! Thanks for linking up!
These are adorable!! I love it ;) I’m also your newest follower!
Jamie http://www.somuchbetterwithage.com
Hi Jamie, thanks! Your blog looks adorable, now following you too!
These are adorable! I would love it if you shared them at Tell Me Tuesdays today! http://mothersniche.com/free-printablelinkparty/
Thanks, Kristina! Linking up now :-)
a very fun art idea!
Please link up to my party here :) http://diycraftyprojects.com/2013/03/whatcha-work-up-wednesday-23.html
These are so adorable! Love the fabric choices!
Jenna @ http://rainonatinroof.com
Thanks, Jenna!
These turned out soooo cute! I love how simple & inexpensive this project can be. LOVE LOVE LOVE!
Thanks Kayla! The canvases are the most expensive part of this project, and if since I got them with a coupon (I used my 40% off Michael’s coupons in 3 separate trips) they came out to less than $5 each, including fabric and paint! Can’t beat that!
These turned out great! I love that you try other peoples projects! I’d love for you to check out our Pattern Party! Those with free patterns and templates to share are invited to link up.
http://getyourcraptogether.blogspot.com/search/label/Pattern%20Party
What a neat idea for a party, I’ll definitely be checking that out regularly! Thanks for visiting!
Thanks for linking up at Someday Crafts! I love this idea – and it looks so easy. Just want to let you know that this will be featured tomorrow at Someday Crafts, so be sure to stop by and check it out!
Wow Miranda, thanks so much! I am a brand new blogger and this will be my first ever feature!! :-D
What a darling idea! Thank you for sharing! We would love to have you link this idea and any others you wish at our party. It is a weekly Thursday party, going live tonight (Wed.) at 8:00 p.m. MST ~ Hope to see you there!
Thanks and have a great day!
Joye & Myrna (The Busy Bee’s)
thebusybhive.blogspot.com
Thanks so much! Just linked up to your party, thanks for the invite!
This is adorable! I love this and it is so easy. Would love for you to link up to my Crafty Tuesday Link Party this week. http://www.bloominghomestead.com/2013/03/crafty-tuesday-3513.html
-Marie
Thanks for the invite! Just linked up :-)
They turned out fabulous! I found you at the Glimpse Inside party. Megan
Thanks Megan!
I love that these can grow with the child and are not baby-centric. Silhouettes of your children would look great done like this.
Great idea, I love that!
Super cute! I don’t have children but I can see this with LETTERS (I love to Monogram)!
I found you today thru the the Pinterest Power Power at The Taylor House, where I’m #79. I hope you get a chance to stop by my blog and leave a comment, too!
~ Megin of VMG206
http://www.vmg206.blogspot.com
Thanks Megin! Stopping by your blog now…
This is a fantastic idea! I can see it working in so many different rooms — really a great way to add a pop of color and inexpensive but attractive wall art. I’ve Pinned it and hope to give it a try soon! If you haven’t already, I’d love if you’d come join my How To Tuesday link party, too.
http://housewifehowtos.com/link-party-2/how-to-tuesday-link-party-11/
Hi Katie, thanks! It’s definitely really inexpensive and you can really do whatever you want with the basic technique! Even if you don’t paint anything on it, if you’ve got some gorgeous fabric it could be some great artwork for any space! Thanks for the invite, linking up now :-)
Really cute! These look so professional!
[…] Painted Fabric Canvases from Unoriginal Mom […]
This is such a great project and I love how yours turned out! My favorite is the elephant :) Thanks so much for sharing at Mom On Timeout! Pinned!
Hi Trish, thanks for visiting and for pinning!! :-)
This is such a cute idea! I love it! I’m cohosting the link party with Him and Her and am featuring this at my link party tomorrow! I hope you’ll come by and say hello!
Thanks so much Alexis, I will definitely stop by! :-D
Seriously, these are so cute! I need to make some for my son’t room :)
[…] DIY Painted Fabric Canvases […]
I love this! I is pinned…and thanks for stopping by Dear Beautiful You today:-) You have a new follower…Christina at dearbeautifulyou.com
Thanks Christina! Following you as well :-)
Loved you material covered canvas. It gives me an idea for my next art class Shall have to have a close look through my local shop for material, or the stack I have in the sewing room. From Capel Western Australia
[…] someone looking to brighten up their sunroom. Spray-paint a worn woven chair with a bold new hue. DIY Painted Fabric Canvases are a inexpensive way to add a pop of color. Add more color to the room with pillows. Make a pillow […]
[…] Taste | Spray Painted Curtains from Life on Mars | How To Make Fabric Paint from Live Love DIY | Painted Fabric Canvasas from Unoriginal Mom | Stenciled Pillows from Tatertots & Jello | Painted Polka Dot Burlap […]