
Hard to believe it, but Father’s Day is right around the corner! Here in central PA, it felt like winter until just a few days ago (seriously, we had snow two weeks ago!)…so the month of June has completely snuck up on me. Where did May go?!?
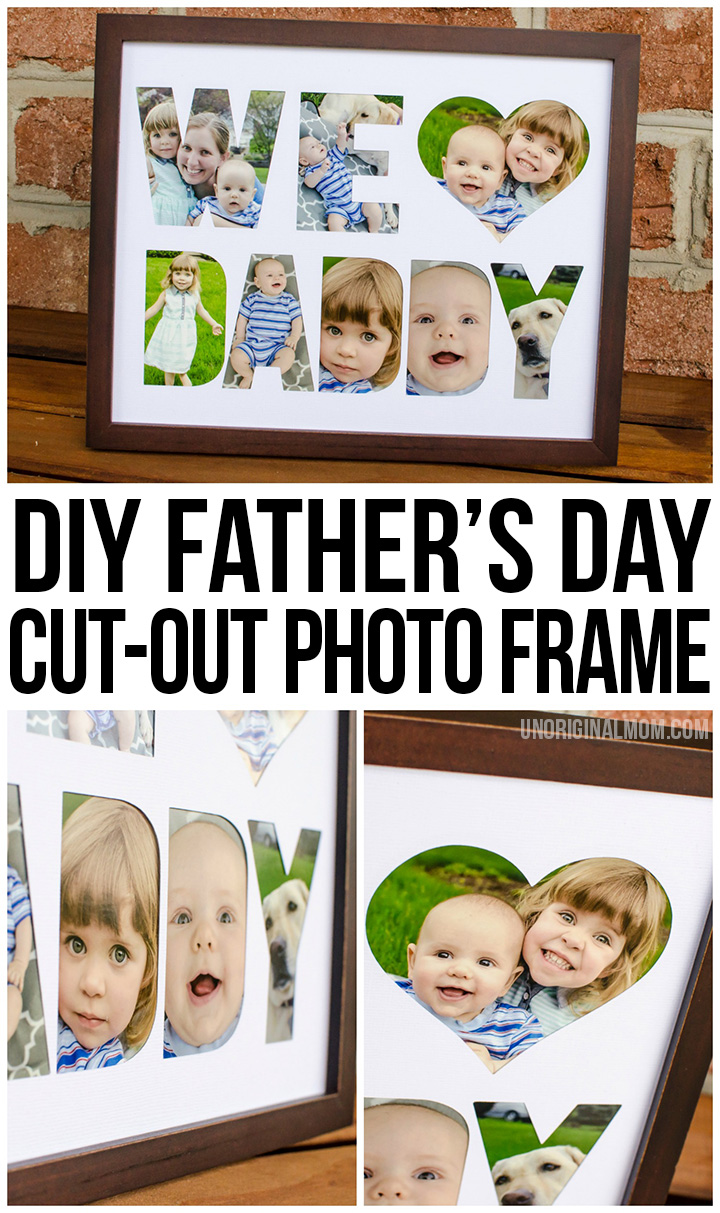
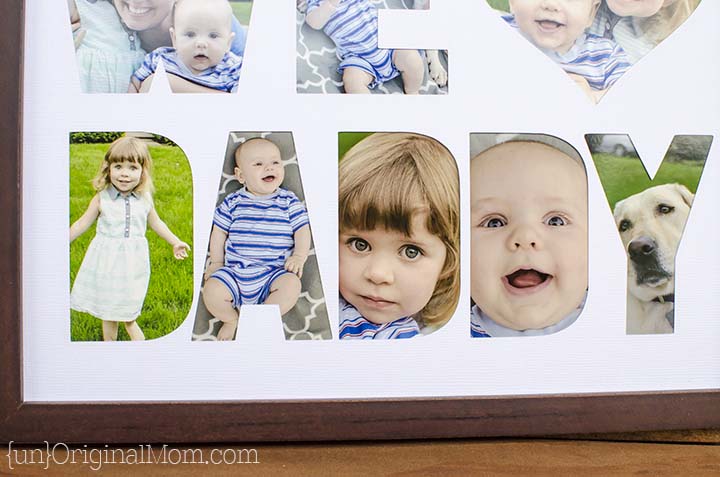
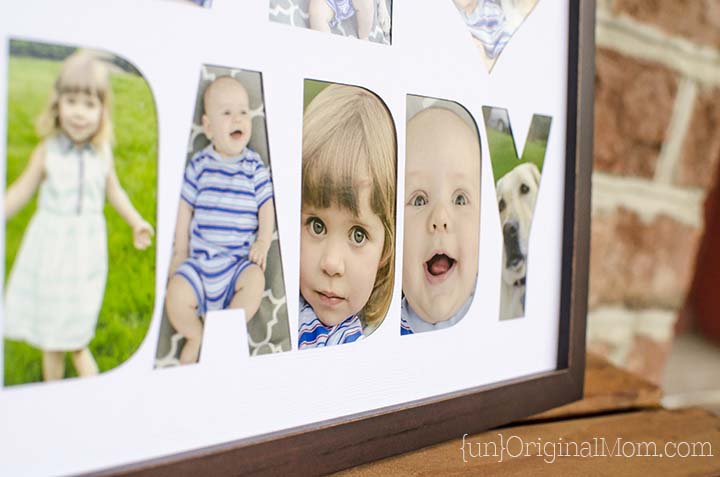
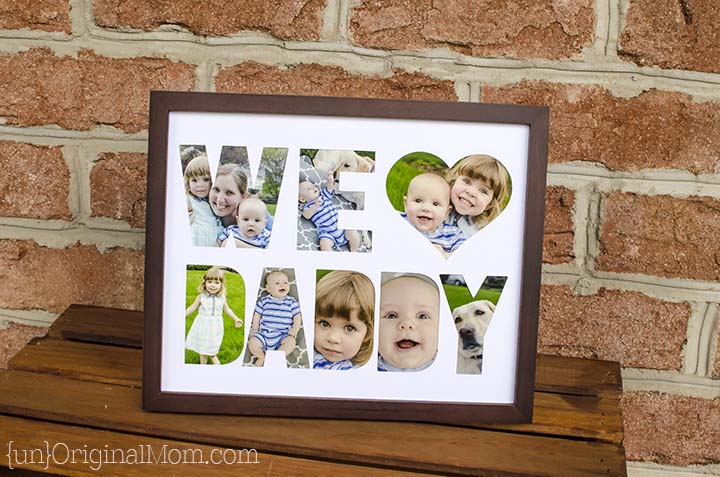
If you’re looking for a relatively easy Father’s Day gift for your husband or father that they will absolutely love, this project will certainly fit the bill! I actually made it for my husband LAST year and of course I didn’t get it finished in time to blog about it (any other “pro-craft-inators” out there? hehe) – but it has gotten LOTS of compliments from his coworkers as they’ve seen it on the desk in his office, so I decided it was worth digging out to share! (Yes, I had him bring it home so I could take photos of it. #lifeofablogger)
Now, before we jump into the tutorial, you should know that I used my Silhouette Portrait to make this – but you do NOT need a Silhouette machine to make this project! Silhouette Studio – the program you use to design things to send to your Silhouette – is FREE, so you can download it to create the photo letters and just print out your project without cutting a photo mat. It will still have the same effect.
Your two options for this project are as follows: OPTION A – use Silhouette Studio to lay out your photos and then use your Silhouette machine to cut a “We <3 Daddy” photo mat that will lay on top of the photos (this is what I did). OPTION B – use Silhouette Studio to design a “We <3 Daddy” photo collage, with no photo mat. It will look exactly like mine, except just a printed photo without a photo mat. Don’t worry if that sounds confusing, I’ll walk you through it step by step, I promise!
Ok, first things first. If you don’t have Silhouette Studio, go ahead and download it here (the basic version is all you need). Second thing, you’ll need the cut file that I created – download it here. (Fine print: this file is for PERSONAL use only. Please do not share it on your blog, via email, etc – send people to this post to get the file themselves. I often share free Silhouette cut files – make sure you’re subscribed via email so you don’t miss them!) The other thing you need are PHOTOS of your adorable kid! Have the photos you want to use in a folder on your computer, open on your desktop.
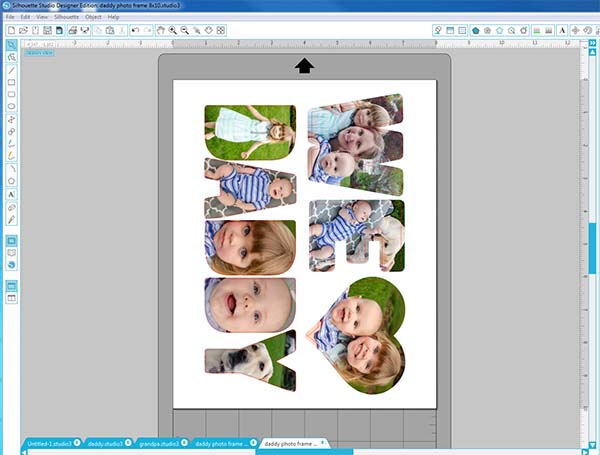
Are you with me so far? Good! Now, open up that cut file. This is what you’ll see. OPTION A people (Silhouette users) – the blue lines are where your photos will go, and the red lines are your cut lines for the photo mat. (The blue lines are slightly bigger to allow some bleed around the letter cut-outs – it’s a whole lot easier to line up that way.) OPTION B people (non Silhouette users) – go ahead and DELETE all the blue lines. You’ll put your photos inside the red lines.
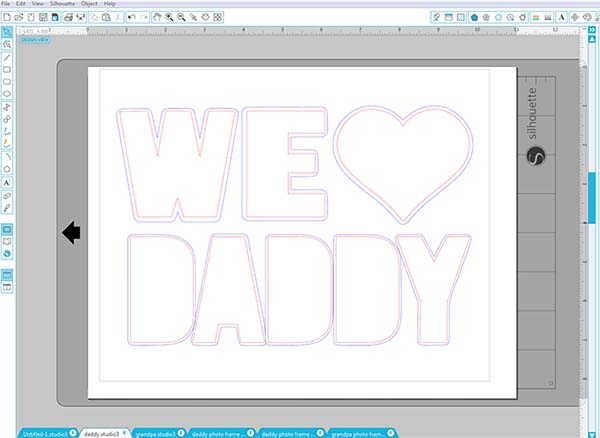
Now, drag and drop a photo into your Silhouette Studio window, being careful NOT to drag it directly onto a letter. (It will merge with the letter but you won’t get to decide how to crop it.) Re-size the photo by holding “shift” and dragging the corner in. Right click and select “Send to Back.” You’ll be able to see the red and blue lines in front of your photo.
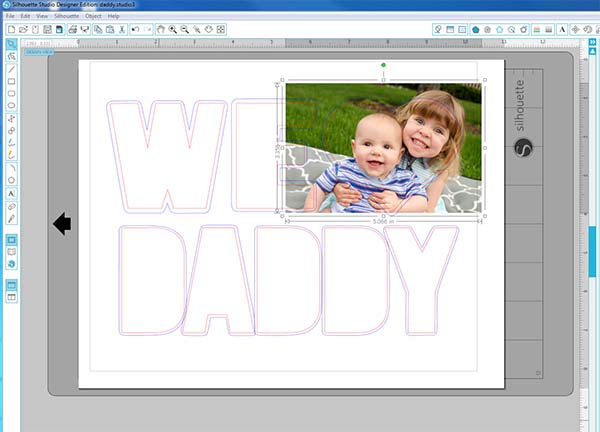
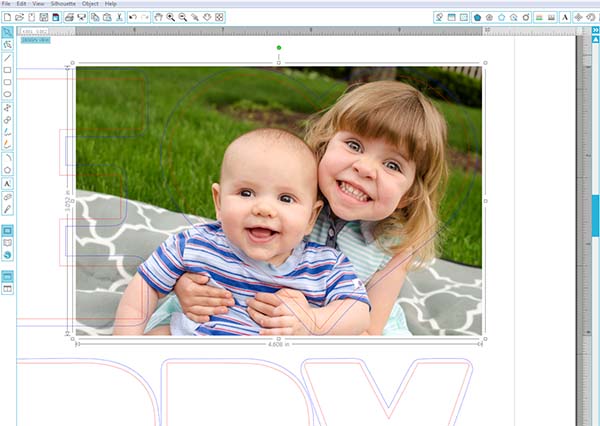
Now drag and re-size your photo until you get it just where you want it. OPTION A people, Remember that the RED lines are what you’ll see of the photo through the photo mat (the blue lines are the full bleed), so line up your photo accordingly.
Once you have it where you want it, open the MODIFY window (the 9th icon in from the top left, it’s a little gray box and a blue M inside a circle).
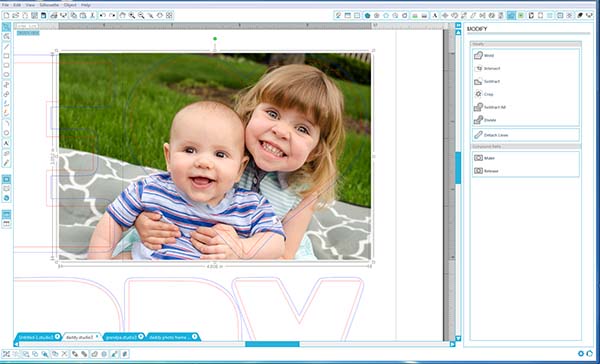
Select your photo, hold shift, and select the BLUE line. (OPTION B people, use the RED line – remember I had you delete the blue lines.) With both the shape and the photo selected, click “CROP in the modify window.
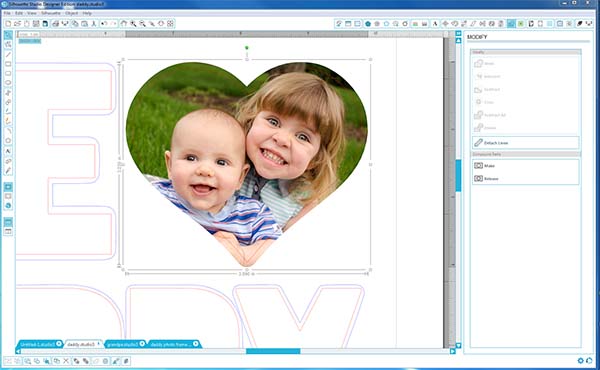
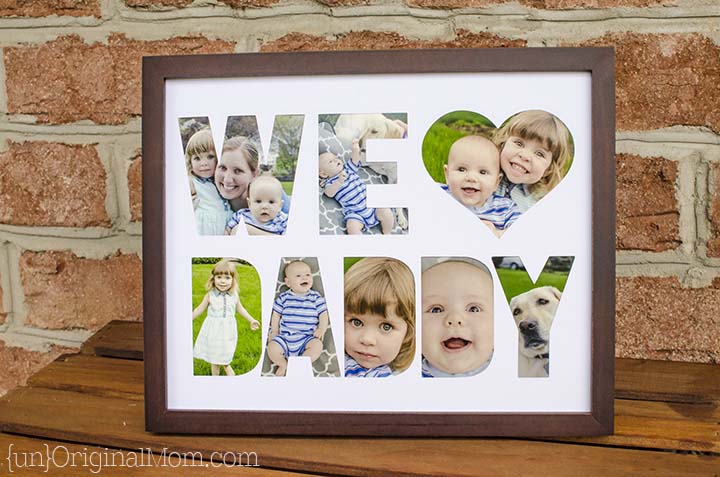
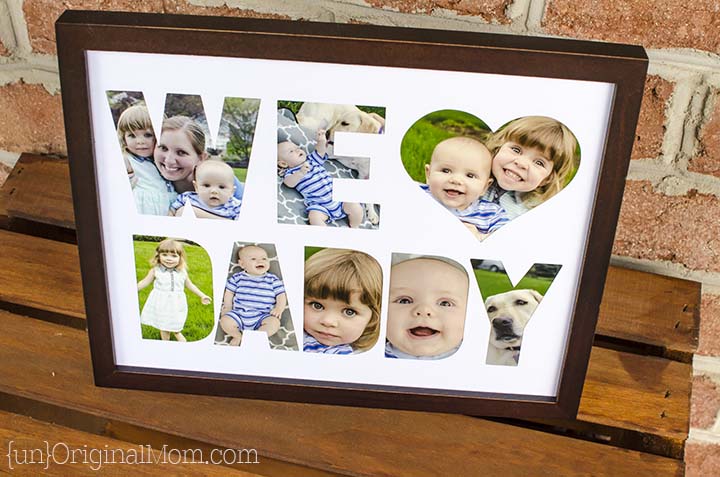
Ta-da! You should now have a letter (or heart) shaped photo! Now, repeat with all your photos and letters!
This cut file is sized to 8×10″, so if you want a different dimension you’ll have to adjust your page size accordingly. If you’re printing on your home printer, go ahead and print directly from Silhouette Studio. (Silhouette users, since we are not cutting the photo out, there’s no need to add registration marks.) Now, if you’re printing at a print shop or want an actual printed photo from a photo lab to put in your frame, it’s a bit trickier to pull a printable format from Silhouette Studio (you’ll want a PDF or a JPEG). Kay from Clever Someday has great tutorial on how to do this on a PC or Mac, so head over there to learn how if you’ve never done it before. Pay careful attention to making sure you’ve sized your image correctly and selected the correct orientation – the page size matters! It can’t hurt to do a test print from your printer to make sure your photo is actually printing at 8×10.
OPTION B people – you’re done! Print your photo collage and frame it. Daddy will absolutely love it!
OPTION A people – we still need to cut your photo mat. Remember, since we’re not actually cutting out any photos, there’s no need to do a print and cut with registration marks. All you need is to load thick card stock into your machine, select the appropriate cut settings, and CUT the RED LINES. Don’t forget to make sure that only the RED lines are set to cut! (That includes the 8×10 rectangle around the edge so you can make sure this is lined up perfectly inside your frame!)

I just used a single piece of linen card stock for my photo mat, but if you’d like a thicker look to your mat you can cut several pieces of card stock and then layer them on top of each other in the frame. That’s all there is to it!
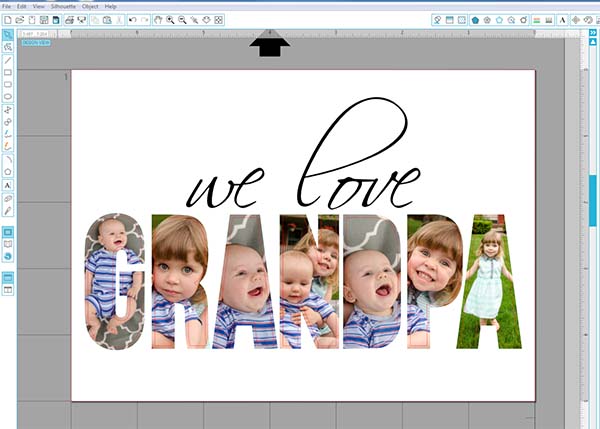
I also made one of these for MY dad! If you’d like the “we love GRANDPA” version, you can download that cut file here. (Fine print: for PERSONAL use only.)
Of course, you could use this technique for ALL kinds of different gifts…for Mommy or Grandma, “Thank You,” “Congratulations,” even the last name of a new Mr. & Mrs…endless possibilities!
Happy Crafting!


Get your copy of my FREE meal planning binder!

Sign up to get a free copy of my meal planning system - an 11 page printable meal planning binder, complete with a pantry inventory, shopping list, and more to help get on top of your menu each week!


I love this project and just finished it but am trying to export as a PDF and Silhouette freezes. I went to the link you provided and commented there as well, but I was wondering if you had anyone else experience this problem and what they did, if so.
Hm…it’s happening when you try to print to PDF? My default troubleshooting with Silhouette Studio is to first try to restart the program, then if that doesn’t work restart the computer, then if it’s still not working shut it all down, walk away and come back to it a bit later. The program can definitely be glitchy at times. It may be a problem with the PDF printer, too, so if it continues maybe try a different one? I usually use Foxit Reader and haven’t had problems printing to PDF from Silhouette Studio before. I hope you are able to figure it out!
On the site you referenced she indicated that save times are just exceptionally long for the larger files. I stepped away from the computer while I thought it was frozen and let it sit for a while…sure enough, it eventually saved.
My new question is now how to get other letters of the alphabet. I want to use this idea for a few gift giving opportunities but obviously “DADDY” doesn’t work for them all LOL
Oh good, I’m glad you figured it out! As far as creating other letters go, I used the font “Bebas Neue” and then modified each letter a bit to make the “Daddy” and “Grandpa” photo letters. You can stretch and squish the letters until you get them the size you want, and for letters that need lines in the middle removed (like an “O” or an “R”), right click, select “remove compound path,” and then you should be able to delete the inside lines without deleting the outside ones. I hope that makes sense!
Hi I want to do th “I love daddy ” one. How do I get that one on a mat and eliminate the other one. I am just learning to do thing on the cameo. Can you help? Thank you for this detailed instructions.
You’ll just need to drag the “I <3 Daddy" onto the mat, after you delete or drag off the "We <3 Daddy" design. Make sure you have all the pieces selected and drag them all together. I hope that helps!
Thank you so much…just leaning this silhouette stuff!
can you help me get rid of blue lines sorry for all the questions
None of the lines are set to have any thickness, so they won’t show up in the printed photo. You’ll just want to make sure they’re not set to cut when you go to cut your photo mat.
THIS IS ADORABLE!!! Ok, just another reason I want to buy a silhouette. :)
Thanks so much Cindy! Yes, my Silhouette is my favorite crafting tool EVER. It’s an amazing little machine!
[…] I’m definitely making one of these for my husband. He’s been asking for some new pictures for his desk at work and this cut out picture fits the bill perfectly! via Unoriginal Mom […]
Meredith – so cute… Would love to do this. I’m having trouble downloading the file for the daddy photo – anyway I could get it emailed?
Hi Debbie, are you having trouble actually downloading the file to your computer? Or opening it once it’s downloaded?
I love this and would love to make it for Father’s Day 2016!! I was able to download the Silhouette Studio file via the link you provided but, just like Debbie in the previous comment, the “Daddy” file isn’t working. It downloaded, but when I click on it to open it, it says “There is no application set to open the document “daddy (1).studio3”.” Any suggestion for how to work around this? I’m on a Mac. THANK YOU!
Hi again :) It’s working now…not sure what I did, I just kept trying and trying and eventually it worked. Thanks again for this fantastic and amazingly adorable resource!!
Yes, sometimes you have to select the program you want to open the .studio file because it doesn’t know what kind of file it is or what program to try it with. My Mac does the same thing, which is super annoying! But I’m glad you got it working!!
[…] (Source) […]
Hello!
When I try to use the I <3 Daddy template, I can only delete the blue lines from the I and the heart. It is not allowing me to delete the blue lines from Daddy and it is not allowing me to click on the either the blue or red lines to crop once I put a photo on each letter.
Any solution or advice?
Thanks!
Hi Kayla, try right clicking and selecting “ungroup” – that should make it so you can select each line by itself. You may have to do it more than once (like if the red and blue lines for “Daddy” are all grouped together, then once you ungroup it once it might be that the red and blue lines for “D” are still grouped together, and “A”, etc.) Hope that helps!
Great idea!! One question.. what brand paper did you use. I love my Portrait but am having trouble finding the right paper for projects, would love some recommendations
Hi Taysha! I buy most of my card stock at Michael’s. I think the card stock I used for the photo mat in this project was a linen card stock so it had a bit of texture to it. (The photo I just had printed at CVS.) I’ve found the Michael’s brand to cut well, but I’ve also used card stock from JoAnns and Hobby Lobby and it works well too…Michael’s is just closest to my house haha.
I just used the Daddy one and it turned out great! Is there any way i can get a We Love”PawPaw” one?
I’m so glad it worked for you! I’m sure he’ll love it. I don’t have any other versions but I left some instructions on how to make other words in a comment above, you could try making it yourself!
I followed those instructions the best I could to no avail. I couldn’t even get the correct font, it just wasn’t an option on my system. t’m one of the “Option B” people without the machine and just learned enough to get the Daddy one done. HELP PLEASE!!!
You have to search online for the Bebas Neue font (it’s free), download it, install it on your computer and then open Silhouette Studio – it should be there! But actually, you could take the P and A from the “Grandpa” file and the W from the “we love Daddy” file and create “paw paw” without having to re-do any letters. You may have to “ungroup” the letters to be able to move them independently from each other (right click and select “ungroup”) but then you should be able to move them around, and even copy and paste the letters between files. There is an “align” toolbar along the top where you’ll find options to align the letters to each other and even space them horizontally so there’s even space between each letter.
If I want to change the name i.e. Mrs , Mrs ect What font is this and How do I make it clear the font to insert pictures I hope you understand the question… I do hope so :)
Hi Connie, I used the font “Bebas Neue” – it’s a free font you can Google and download. Once you’ve installed it on your computer, re-open Silhouette Studio and you’ll be able to use it there. You can stretch and squish the letters until you get them the size you want, and for letters that need lines in the middle removed (like an “O” or an “R”), right click, select “remove compound path,” and then you should be able to delete the inside lines without deleting the outside ones. I hope that makes sense!
[…] DIY Father’s Day Photo Frame Tutorial from unoriginalmom.com […]
Has anyone done this yet without Silhouette Studio?
I do not have this and really like how this turned out. Can this just be printed on any color printer? Suggestions for doing it completley on desktop computer
Hi Lisa, Silhouette Studio is a free program, so you can create this in the program and print directly from there, even without a Silhouette machine. You would be following OPTION B in the tutorial above. Hope that helps!
Hello,
I have just finished this project and I couldn’t be happier. Thank you for your tutorial.
I love this project and really want to try it, but every time I try to download the cut file you created, it tells me it cannot be previewed and the file does not exist. Am I doing something wrong?
Hi Ashley, you won’t be able to see a preview but you should still be able to download it from the box.com link. Once it’s downloaded, it will only open on your computer with the program Silhouette Studio. Hope that helps!
Yes! I figured out how to open the image, thank you! But when I get to the step where you say to click the “modify” button, I do not have a modify button. I have 7 buttons at the top, but there is no modify button so I cannot figure out how to get the pictures to cut to the shape. Any suggestions?
You can also get to the “modify” options under the “Object” menu at the top of the page. So you’ll want to find object…modify…crop.
I figured it out and it came out wonderful! Thank you so much, my husband is going to adore this!
I figured out how to open the image! But when I get to the step where you say to click the “modify” button, I do not have a modify button. I have 7 buttons at the top, but there is no modify button so I cannot figure out how to get the pictures to cut to the shape. Any one have this problem or have any suggestions?
Did you ever find the Modify button? I guess in a newer version it is on the right side of the screen vs. the top. The symbol is a circle overlapping a rectangle.
I am having the same issue that Ashley did. It says that it is unable to preview, but it also won’t let me download it. :( Any idea on what I may be doing wrong, or if there is another way for me to get the file?
love love love this!!!! just made for my hubby’s bday but how can i change the name so i can make for the grandparents?
[…] Traza la silueta de las letras que vas a recortar, verificando que las fotos queden bien dentro de los recortes. Recorta las siluetas de las letras y coloca detrás de la cartulina las fotos, puedes sostenerlas con pegamento o cinta adhesiva. Por último, coloca la cartulina con las fotografías dentro del marco. Puedes ver el tutorial completo en Unoriginal Mom. […]
Hello! I jut did this and love it so much! Thank you! Is there any way to save it to my computer or a flash drive so I can take it to a print shop? When I print it on my home printer, it just doesn’t have that *pop* that I’m looking for. Thank you!
Yes! You can “print” it to a PDF or there’s a link in the post above to another blogger who has a great and detailed tutorial on saving to a PDF or JPEG and getting the page size correct. Then you can take it to a local print shop or send it away to Shutterfly or something to get a photo printed.
I am looking for the link on the tutorial on saving to a PDF or JPEG and not seeing it. Can you help me, please! Thanks :)
Hi Mandy, there is a whole paragraph in the post above about sizing your print correctly and what to do if you’re sending it to a print shop to get it printed. The link is to this tutorial – http://cleversomeday.com/ssprintables/
Thanks so much!
[…] Day gift ideas for you to browse. I love this DIY Father’s Day photo frame mat from the Unoriginal Mom. Use your Silhouette or cut out the letters by hand, then add your favorite family photos for a […]
Hi! I’m trying to create this through Option B, but in my iPhone instead of computer. I was able to download the Sillouette app & download the file to Evernote, but can’t figure out how to open the file in Sillouette now. Do you have any experience with the iPhone app version or possibly know how I can open it in the app?
Hi Kim, I’ve never used the Silhouette App before so I’m sorry, I don’t know how to help you troubleshoot very well! My understanding about the App though is that you can only open and use files from your Silhouette Cloud account, not files you’ve downloaded to your phone. So you’d have to download the cut file on a computer, and then add it to you Silhouette Cloud account, then access it on your phone. Hope that helps!
Hi! These are wonderful! I would love to have “I (heart shape) daddy” instead of “we” and also an “I (heart shape) you” one done. I tried to create my own letters and I wasn’t very successful plus I don’t have the font you used to create yours. Any way you could create these files for me and I could pay you through paypal for them? It would save me so much work! Let me know if this is something you would do. Thanks!
Hi Anna, I’m sorry but I just don’t have enough hours in the day to create items/files for sale! The font I used is Bebas Neue, which is a free font – if you download it and install it on your computer, then open Silhouette Studio, it should be there as an option for you to use as a font.
Hi Meredith! I absolutely love this!! I’m trying to make one for fathers day but when i drag the photo i can’t get it to do what your saying it should? I drag it from the folder holding shift? it just goes huge on the whole page. Help lol Thank you (:
Hi Danielle! You don’t have to hold shift when you’re adding it to Silhouette Studio…just drag it and drop it into the program. If it’s a large size photo (which is good for printing!) and it ends up huge on your page you can resize it down (hold shift and drag the corner of the photo in) to the size you want it to be. Once you have it the right size and the right position within the letter, then you select the photo and the letter together (holding shift to select them both), and go to the Object menu…under modify…select “crop.” Then the photo will crop to the same shape as the letter! Hope that helps!
Do you know how to print this on a cricut? Thank you so much for this!
Hi Lauren, I have zero experience with Cricut so I think it probably could be done but I have no idea how, sorry! Silhouette Studio is free, though, so you could make the photo part without any kind of cutting machine and just print the picture.
Hi Meredith, What a wonderful project. Thank you for sharing. I’m having a problem. When I opened your file in Silhouette it size doesn’t much up with white page size which is about 2 by 3.5. How do I adjust the page size to align with your file? I appreciate your help.
I think I know what the problem was, I downloaded the mint studio instead of Silhouette.
Oh yes, that will do it! I’m glad you figured it out!
So I was able to go through all of the steps but I have real difficulties sizing my photos right. I get the message “this design may print in low resolution causing graininess and pixation in the printed artwork. For a higher resolution print you will need to make image smaller silhouette” I tried resizing, cropping and can’t seem to get it to work. I’m trying to use very good quality large images. Any types on what I can do?
I got it to cut just fine. How on earth do I get the letters to come out nice and clean? Total newbie and it looks awful :( Trying to look online for tips and not finding anything. I used regular cardstock. Thanks for the advice!
I got it figured out! I had to select autoblade. Thank you for this amazing freebie!
Oh good I’m glad you figured it out!!
[…] Traza la silueta de las letras que vas a recortar, verificando que las fotos queden bien dentro de los recortes. Recorta las siluetas de las letras y coloca detrás de la cartulina las fotos, puedes sostenerlas con pegamento o cinta adhesiva. Por último, coloca la cartulina con las fotografías dentro del marco. Puedes ver el tutorial completo en Unoriginal Mom. […]
[…] 6. Cutout Photo Frame (idea from Unoriginal Mom) […]
[…] The UnOriginal Mom has an easy “two-way” tutorial to make an adorable manly Cut-out Photo Frame for Dad to put in his office or […]
Hi Meredith! Everything turned out wonderful. it was easy. Thanks so much for sharing! However I would like to send to Staples or even Costco to print IF I can have them make it larger? Is that possible? and if so…… How can I “save” the project in order to send it to any one of the outside sources for printing? The tutorial in your instructions do not work…There are no videos that download?
Hi Liz, I checked the link to the file converting tutorial over at Clever Someday and it seems to be working, the videos show for me…here’s the link again – http://cleversomeday.com/ssprintables/
As far as size goes, I’m not sure if you’d be able to do any larger than what you have on your page without the image quality suffering a little bit…but you could try it!
Hello again Meredith! unfortunately I tried the link again to no avail… i am not sure if my mac doesn’t have the application i need to view these videos but there is literally a huge blank space where the video should be….oh well, ive been trying to figure it out on my own…. somehow i was able to save it and send it to muself via email… but it cut off a portion of the photo? hahaha!!! ill do what i can and then move on! Thanks again for your help and your response! hope you have a great day!
That is odd! Here is a link directly to her YouTube video, the Mac one that’s embedded in the blog post, you should be able to watch it right on YouTube…hopefully that helps! https://www.youtube.com/watch?v=BuXeZP472dY
Hi Meredith! I love this idea, I got to the part where I deleted all the blue lines but I tried to drag my photos from my computer photo library and nothing is staying onto silute, can you walk me through how to get the pictures on the file
Thanks
Hi Nicole, if the dragging and dropping isn’t working, you could also just do a “File…Open” to get the photos open in their own tab, then copy and paste them into your original file.
Hello, I’m a little late to the silhouette world but I love this project. I would like to make it for my dad from his grandkids saying I <3 PAPI. That's what my kids call him. Is there any way you can tell me what font you used? Again I am very new to all of this.
Hi Melisha, the font I used is Bebas Neue…though if you don’t want to create it from scratch, you should be able to make PAPI with a combination of the letters from my “GRANDPA” file and the “I” from the DADDY file.
Hi Meredith
I figured out how to put the pictures in there but my printer at home isn’t the best and would love to print it somewhere else, how do you save it as a picture or pdf and get it printed at a store? Do you need the program to open it?
Hi Nicole, in the blog post I linked to a video tutorial from the blog “Clever Someday” for how to convert your file to an image or PDF, which you should be able to take to a print shop or send away to be printed at Shutterfly or something like that!
Hi Meredith,
I opted for Option B, but I have used multiple photos in each of the letters instead of one. Whenever I go to crop it in modify, it only crops a portion or scrambles the pics up or uses one photo for the whole letter. Do you know if there is any way I can fix this so I can get this printed out? Thank you!
Sorry Jenna, I don’t think it’s possible to do multiple pictures inside one shape…or if it is, I don’t know how. I’ve only ever done one image per letter. The only solution I can think of is to take the photos and combine them into one image in another program (you could use an online editor like PicMonkey or Canva) and then bring it into Silhouette Studio to crop into the letter shape.
Thank you! I will try that and see if it works!
[…] 19. DIY We Love Daddy Photo Frame […]
Hi Meredith,
THanks for sharing! I cannot get the cut file to download. When I click your link it opens another tab but the link at app.box.com is blank. what can I do?
I’ve also right clicked on the link and selected download to Silhouette and that didn’t work either.
Hm, that is odd! The links are working for me. The box.com page will give what looks like an error message, saying it can’t preview .studio files, but you should still be able to click the “download” button to get the file. If you’re still having trouble, feel free to send me an email and I can email you the files directly.
This is such a great project! I love it!
I know that you use the font Bebas Neue for the Photo Letters. Can you please tell me what font you used in for the “we love” in the “we love GRANDPA” version?
I read through all of the comments and didn’t see this mentioned. I apologize if I missed it.
Thanks Maggie! I believe I used the font “Scriptina” for that part :-)
Thank you very much. You’re post and your comment replies are extremely helpful!
I am unable to download the We <3 Daddy template. How else can I obtain it to complete this project?
Hi Chantelle, why are you unable to download the file? If you give me some more information maybe I can help you troubleshoot. You will need to download the program Silhouette Studio (linked in the tutorial) in order to open the file.
Just came across this! How do I get my photos from Amazon Prime Photos to my Silhouette?
Sorry, I don’t use Amazon Prime Photos so I have no idea how to do that. If you have photos on your computer, all you have to do is drag and drop them into the program, or use “File…open”
Thank you for sharing and great tutorial.
Thank you !!! muchas gracias!!!
Hi, I want to add a few photos in to one letter, almost like a collage. Is this possible?
Hi Charlie, no that’s not possible to do in Silhouette Studio. You’d have to combine the images into a collage in a separate program (you could use an online picture editing program like PicMonkey or Canva) and then bring that image into Silhouette Studio to crop with the letter shape.
[…] Cut-out Photo Frame Unoriginal Mom […]
Gorgeous! Love the view too.
Hi there. Do you have a We “Heart” Mommy file that one could use for Mother’s Day?
No I don’t, sorry!
Hi. Is there any way you could send me the I love daddy file? It tells me it is not supported and won’t download for me.
There should still be a blue “download” button underneath the “unsupported file” message. All that means is that box.com can’t pull a preview image from the file. But it should still download to your computer!
yeah I tried that. It opened in adobe and it won’t support it either and I accidentally clicked the box “always open in” so I can’t open it anywhere else. :-(
Open the Silhouette Studio program first and do a “File…Open…” to choose the file.
LOVE THIS!! THANK YOU!! I just sent my final copy off to print on photo paper and I’m excited to see the results <3
Now I'm working on the grandparent version :)
Hi, there! I just downloaded Silhouette Program, but am now unfortunately seeing it will not let me download the ‘we heart daddy’ or the ‘we love grandpa’ files to edit. I’m totally bummed! Would you mind helping a sister out?! Lol.. Thanks, so much!!
Happy to help, if you can tell me more about the problem! What will not let you download the files? Box.com will give you a “file not supported” message but that only refers to the image preview – you can still click the blue download button and it should download to your “downloads” folder. Then you can do a “file” “open” inside Silhouette Studio to open the files.
[…] Source: Diy Father's Day Photo Frame Tutorial – Unoriginal Mom […]
When I print it or save it as pdf it comes up blank. I have tried different computers and printers and it just comes up blank. Is there something I need to do to make it print correctly.
Did you add photos? The lines won’t print because they don’t have any “weight” (they aren’t supposed to) but after you add your photos they should be printing. I’m not sure why the photos wouldn’t be printing though…
Hi! Thank you for the awesome project. For some reason I can’t crop the image, I’ve tried two different ways (I’m option B) and it doesn’t do anything. When I tried the crop option from the header, it’s greyed out. Thanks in advance!
I finally figured it out after clicking for 30 min. Thank you once again for this!
Thank you for this great tutorial! It was easy to follow and the final product turned out perfectly.
What a great way to capture memories, and celebrate Father’s day.
I love this project. Totally new to the Silhouette world. I am option B. When I printed my project, the lines from the sides appeared along with the words sized to 8×10.
I’m bummed and have no idea how to fix that.
I did this for several people For father’s day and it was a huge hit. Thank you so much. I am interested in trying something very similar using the USA map. I have a USA map SVG is it possible to do something like this with a photo and not just words? If so where do I find instructions for such a task. I’m much more familiar with the Cricut ds program and have only done this project In silhouette.
Oh I’m so glad to hear that! Yes, you could absolutely do the same thing with any shape – the instructions in this post will be exactly the same! You just open up the SVG in Silhouette Studio (you’ll need to use the “trace” tool to get the outline, SVGs only work with Silhouette Designer & Business Edition), and then do the same method of cropping the picture inside the shape outline.
Hi Meredith,
i’m also using a Mac and when i click on the link to open your template it comes up with a blank page.
(and of course i’ve left father’s day gifts to the last minute!) I need to do one with DADDY, POP and GRANDPA.
Is it possible to have the file emailed to me please?
Never mind it just didn’t like my browser!
Thank you so much for this tutorial! Worked perfectly. Such a great idea!
[…] DIY FATHER’S DAY PHOTO FRAME From Unoriginal Mom […]
[…] DIY Father’s Day Cut-out Photo Frame by Unoriginal Mom […]
[…] DIY Father’s Day Cut-out Photo Frame by Unoriginal Mom […]
[…] Father’s Day Photo Frame from Unoriginal Mom […]
[…] TUTORIAL AQUÍ […]
[…] TUTORIAL HERE […]